How to Move a Joomla Site From Localhost to Live Server
如何将 Joomla 站点从本地主机移动到 Live 服务器
It is always a great idea to develop and test your website locally before introducing it to the world. This saves you from creating any unwanted mess and speeds up the whole development process. For details on setting up a local environment, you can refer to our article - how to install Joomla on localhost.
在向全世界介绍你的网站之前,在本地开发和测试你的网站总是一个好主意。这样可以避免您创建任何不必要的混乱,并加快整个开发过程。有关设置本地环境的详细信息,请参阅我们的文章——如何在本地主机上安装 Joomla。
We can safely assume you have a Joomla site running on your localhost, and now you are ready to take the next big move, that is to go live! But how? Even though it sounds tough, you will be surprised to know how easily you can get it done.
我们可以有把握地假设您有一个 Joomla 站点运行在您的本地主机上,现在您已经准备好采取下一个大的行动,即去生活!但是怎么做呢?尽管这听起来很难,但是你会惊讶地发现你可以轻而易举地完成它。
In today’s guide, we will cover everything you need to know to transfer a Joomla website from local to live. Without further ado, let’s get started!
在今天的指南中,我们将涵盖你需要知道的一切,以便将 Joomla 网站从本地转移到生活。闲话少说,让我们开始吧!
Get a Reliable Web Hosting
获得一个可靠的虚拟主机
First things first. Did you sign up with a hosting provider? If not, that is the first thing you need to do to introduce your site to the world.
要事第一。你和主机提供商签约了吗?如果没有,那么这就是你需要做的第一件事,把你的网站介绍给世界。
Before choosing a hosting provider, make sure to do extensive research to get reliable web hosting and prevent downtime. Slow server and excessive downtime can frustrate your site visitors and have a detrimental impact on your business. You can search for web hosting services based on your location, but our general recommendations would be DigitalOcean, SiteGround, or HostGator.
在选择托管服务提供商之前,一定要做广泛的研究,以获得可靠的网站托管和防止停机。缓慢的服务器和过多的停机时间会使你的网站访问者感到沮丧,并对你的业务产生不利影响。你可以根据你的位置搜索网络主机服务,但是我们的一般推荐是 DigitalOcean,SiteGround,或者 HostGator。
You will also need a domain name to give your website a shareable address. Once you have a brandable domain name and a robust hosting provider, you can take the load off your mind. Because things are just going to get easier from here!
你还需要一个域名来为你的网站提供一个可共享的地址。一旦你有了一个品牌化的域名和一个强大的托管服务提供商,你就可以卸下心中的重担。因为从现在开始事情会变得更简单!
Methods to Move Your Joomla Site
移动 Joomla 站点的方法
There are two ways to move an exact copy of your Joomla site from localhost to a remote server. They are:
有两种方法可以将 Joomla 站点的精确副本从本地主机移动到远程服务器。它们是:
- Manually 手动操作
- Or, using a backup extension like Akeeba Backup
- 或者,使用像 Akeeba Backup 这样的备份扩展
You can either move your Joomla site manually or through a backup extension like Akeeba Backup. We will be covering both of the methods in detail. It is up to you to decide which method you are most comfortable with. Let’s get started.
您可以手动移动 Joomla 站点,也可以通过像 Akeeba Backup 这样的备份扩展来移动。我们将详细介绍这两种方法。由你来决定你最喜欢哪种方法。我们开始吧。
Method 1: Move Joomla Site to the Live Server Manually
方法1: 手动将 Joomla 站点移动到 Live 服务器
While this method is a bit trickier than the other, it is still a good practice to learn how to transfer your Joomla site manually. With a few tweaks, you can also use the method to move a Joomla site from one server to another. Let’s have a detailed look at each of the steps, make sure to pay attention to avoid making a mess!
虽然这个方法比其他方法稍微复杂一些,但是学习如何手动转移 Joomla 站点仍然是一个很好的实践。通过一些调整,您还可以使用该方法将 Joomla 站点从一个服务器移动到另一个服务器。让我们仔细看看每个步骤,一定要注意避免弄得一团糟!
Step 1: Transfer Your Root Files
第一步: 传输根文件
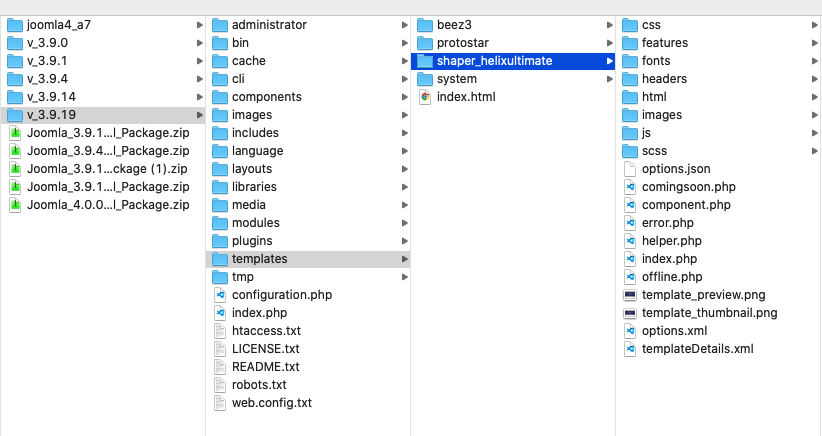
The first step is to copy the files from the root folder of the localhost to the live server. And then, open your FTP client and connect to your web hosting account. Browse the web root directory (www or public_html or so on) of your live server. Upload all the files in the destination directory.
第一步是将文件从本地主机的根文件夹复制到活动服务器。然后,打开你的 FTP 客户端,连接到你的网站托管帐户。浏览您的 live 服务器的 web 根目录(www 或 public _ html 等)。上载目标目录中的所有文件。
Let’s have a look at the procedure step by step:
让我们一步一步来看看这个过程:
- Go to the htdocs folder (or counterpart one) of whatever local web server software you are using
- 访问你正在使用的本地 web 服务器软件的 htdocs 文件夹(或者对应的文件夹)
- Find the folder that has all the Joomla files of the site you wish to move
- 找到包含您希望移动的站点所有 Joomla 文件的文件夹
- Add your files to a ZIP archive
- 将文件添加到 ZIP 归档文件中
- Head over to the hosting server’s web root directory (www or public_html) using an FTP client if needed
- 如果需要,可以使用 FTP 客户端访问主机服务器的 web 根目录(www 或 public _ html)
- Select the destination directory 选择目标目录
- Upload the zipped file 上传压缩文件
- Extract to unzip your local installation files on the server
- 解压缩以解压缩服务器上的本地安装文件
Step 2: Get the Contents of the MySQL Database
步骤2: 获取 MySQL 数据库的内容
The next step is to export and import the database. Please bear in mind, most configuration and data of Joomla extensions are stored in the database. Make sure to carefully follow along in order to avoid creating a mess.
下一步是导出和导入数据库。请记住,大多数 Joomla 扩展的配置和数据都存储在数据库中。为了避免制造混乱,一定要仔细跟进。
Export the localhost database
导出本地主机数据库
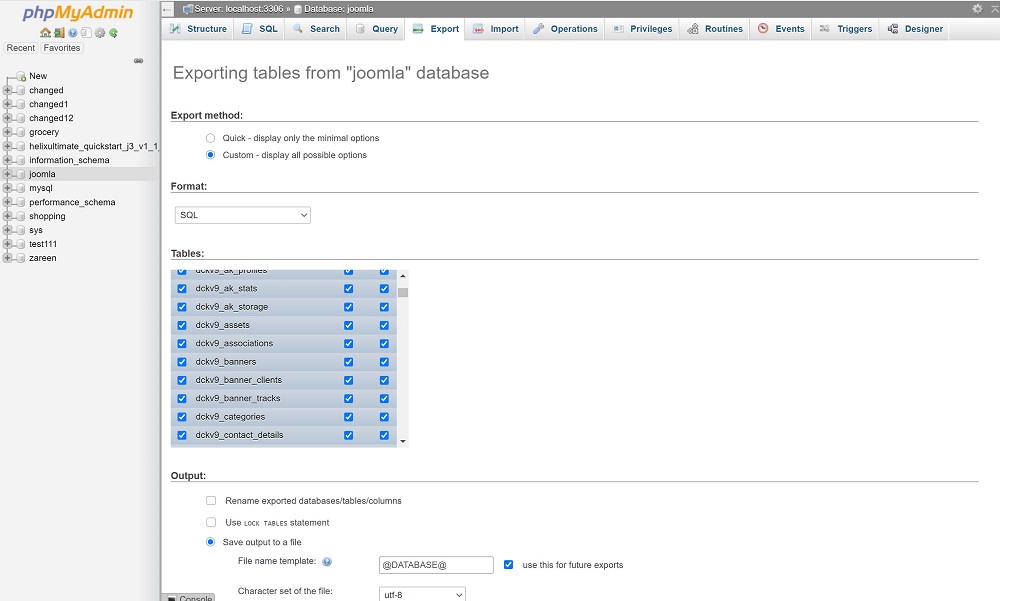
- Go to http://localhost/phpMyAdmin 去 http://localhost/phpmyadmin
- Select the particular database of your site in the upper right-hand side
- 在右上角选择站点的特定数据库
- Click on the Export tab at the top - then select Custom
- 点击顶部的导出标签-然后选择自定义
- Click on Go at the bottom to download the .sql file
- 单击底部的 Go 下载.sql 文件
Import the exported database on the hosting company’s server
导入宿主公司服务器上导出的数据库
- If you use cPanel, open the MySQL Database Wizard and create a new database
- 如果使用 cPanel,请打开 MySQL 数据库向导并创建一个新数据库
- Or, if you’re using a VPS, create a new database from the command line (do a research)
- 或者,如果您正在使用 VPS,可以从命令行创建一个新的数据库(进行研究)
- Or, check your hosting dashboard to find the database manager
- 或者,检查您的托管仪表板来找到数据库管理器
Then:
然后:
- Create a new database for the live site
- 为现场站点创建一个新数据库
- Select the newly created database and find its import option
- 选择新创建的数据库并找到其导入选项
- Import the downloaded .sql file 导入下载的.sql 文件
And that’s it! Your Joomla database has been imported.
就是这样! 你的 Joomla 数据库被导入了。
Step 3: Joomla configuration.php File Adjustment
第三步: Joomla configuration.php 文件调整
Finally, you need to make some changes in the configuration.php file of Joomla to reflect the new server settings.
最后,您需要对 Joomla 的 configuration.php 文件进行一些更改,以反映新的服务器设置。
- Navigate to your live server's Joomla installation folder
- 导航到您的实时服务器的 Joomla 安装文件夹
- Find the configuration.php file 找到 configuration.php 文件
- Edit/check the following lines: 编辑/检查以下行:
public $host = 'localhost'; usually, it remains the same
public $user = 'root'; change it to your new database username
public $password = ' '; enter your new database password
public $db = 'joomla' database’; change it to your live server database name
- Edit the path for logs and tmp directory by finding the following lines:
- 通过查找以下行,编辑日志和 tmp 目录的路径:
public $log_path = 'C:\\MAMP\\htdocs\\joomla\\administrator/logs';
public $tmp_path = 'C:\\MAMP\\htdocs\\joomla/tmp';
Replace the path with the path of the log and tmp directories of your live server.
用 live 服务器的日志和 tmp 目录的路径替换路径。
Save changes and you are almost done!
保存更改,您就几乎完成了!
Step 4: Fix Missing Images and Broken Links
第四步: 修复丢失的图片和断开的链接
Do not panic if some of the images or links are broken! It is quite normal to experience broken links and missing images when you migrate your site from one server to another. To solve the issue, just make sure the roots of your links are pointing to the new server instead of the old one. And, you are good to go.
如果一些图片或链接被破坏,不要惊慌!当您将站点从一个服务器迁移到另一个服务器时,出现链接中断和图像丢失是很正常的。要解决这个问题,只需确保链接的根指向新服务器,而不是旧服务器。你可以走了。
Congratulations on successfully migrating your Joomla site to a live server!
恭喜您成功地将 Joomla 站点迁移到一个实时服务器!
Method 2: Use Akeeba Backup to Move the Joomla Site
方法2: 使用阿基巴备份来移动 Joomla 站点
Alternatively, you can backup and restore your Joomla site using Akeeba Backup. To do this, you will be using the Akeeba Backup Joomla extension first to take a backup of your website (root files and database) and then Akeeba Kickstart to restore the backup to the live server. The transfer process consists of the following steps.
或者,您可以使用 Akeeba Backup 备份和恢复 Joomla 站点。要做到这一点,你需要使用 Akeeba Backup Joomla 扩展首先备份你的网站(根文件和数据库) ,然后使用 Akeeba Kickstart 将备份恢复到实时服务器。传输过程包括以下步骤。
Step 1: Download and Install Akeeba Backup
第一步: 下载并安装 Akeeba 备份
First of all, you need to download the Akeeba Backup extension. Once you have downloaded the latest version in .zip format, login to your Joomla site administrator dashboard. From the dashboard, click on Extensions > Manage > Install. Here, under the Upload Package File option, browse and select the downloaded file. This will upload and install Akeeba Backup on your site.
首先,您需要下载 Akeeba Backup 扩展。一旦你下载了最新的版本。格式,登录到 Joomla 站点管理员控制面板。在仪表板上,点击 Extensions > Manage > Install。在这里,在 uploadpackagefile 选项下,浏览并选择下载的文件。这将上传和安装你的网站上的阿基巴备份。
Step 2: Backup Your Files
第二步: 备份文件
After the successful installation of Akeeba Backup, the next step is to take a backup of your site. Simply do this by:
安装成功后,下一步是备份站点。简单的做法是:
- On top of the dashboard, select Components and then Akeeba Backup
- 在仪表板顶部,选择 Components,然后选择 Akeeba Backup
- Click Backup Now. The backup can take anywhere between 1 minute to 10+ to complete depending on the size of your website
- 点击立即备份。备份可以在1分钟到10分钟之间的任何地方完成,这取决于你网站的大小
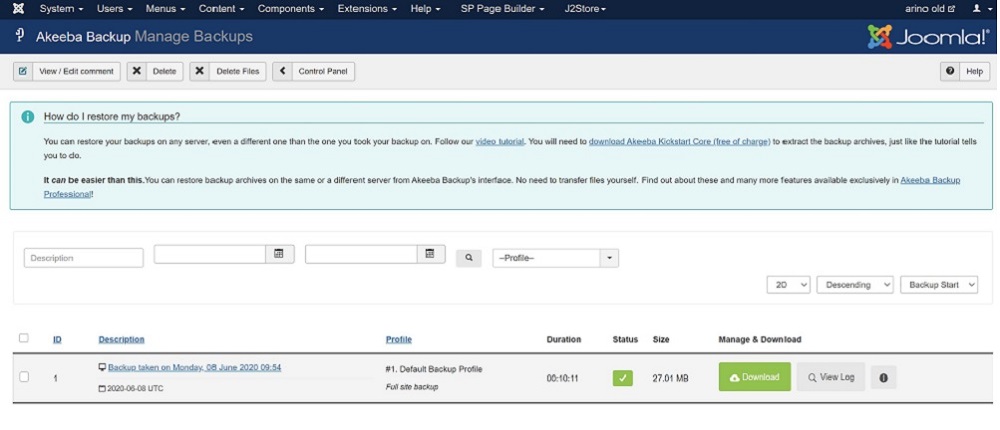
- Once the backup is completed successfully, go to Manage Backups and then click on the Download button
- 成功完成备份后,转到“管理备份”,然后单击“下载”按钮
- This will download a .jpa file to your computer
- 这将下载一个.jpa 文件到您的计算机
Step 3: Download Akeeba Kickstart
第三步: 下载 Akeeba Kickstart
This step is pretty simple and straightforward. All you have to do is download Akeeba Kickstart to your computer. Do keep this in mind, from the downloaded folder the only file we need is the kickstart.php file.
这一步非常简单直接。你所要做的就是把阿基巴 · 凯斯特下载到你的电脑上。请记住,从下载的文件夹中,我们需要的唯一文件就是 kickstart.php 文件。
Step 4: Upload the Files to Your New Server
第四步: 上传文件到你的新服务器
From your hosting control panel or FTP client, select the destination web root directory and upload the .jpa file from step 2 and kickstart.php from step 3 to the new server.
从您的主机控制面板或 FTP 客户端,选择目标网站根目录,并上传。从第二步的 jpa 文件和 kickstart.php 从第三步到新的服务器。
Step 5: Create a Database on Your Hosting Company’s Server
第五步: 在你的主机服务器上创建一个数据库
From your cPanel or server’s database management system, create a new database for your live site. Do not get confused here, we need a new database to store the data that is already present in your downloaded .jpa file.
从您的 cPanel 或服务器的数据库管理系统,为您的现场站点创建一个新的数据库。不要在这里混淆,我们需要一个新的数据库存储的数据已经在您的下载。Jpa 文件。
Step 6: Run the Kickstart Installer to Install Your Site on the New Server
第六步: 运行 Kickstart 安装程序在新服务器上安装你的网站
We are almost done! All you have to do now is from the browser go to (URL of your live site)/kickstart.php. Something like example.com/kickstart.php. You will be presented with a screen like below.
我们快完成了!你现在要做的就是从浏览器转到(live site 的 URL)/kickstart.php。比如 example.com/kickstart.php。您将看到一个如下所示的屏幕。
Select your archive file from Step 2 and the extraction method, then hit Start. If your Akeeba Kickstart starts but does not extract the archive file, please visit here and solve the issue accordingly. Once the extraction is complete, you will see a page that says ‘Run the Installer’.
从步骤2和提取方法中选择存档文件,然后点击开始。如果您的阿基巴启动启动,但没有解压缩档案文件,请访问这里,并解决相应的问题。一旦提取完成,你会看到一个页面,上面写着“运行安装程序”。
Run the installer and do the following:
运行安装程序并执行以下操作:
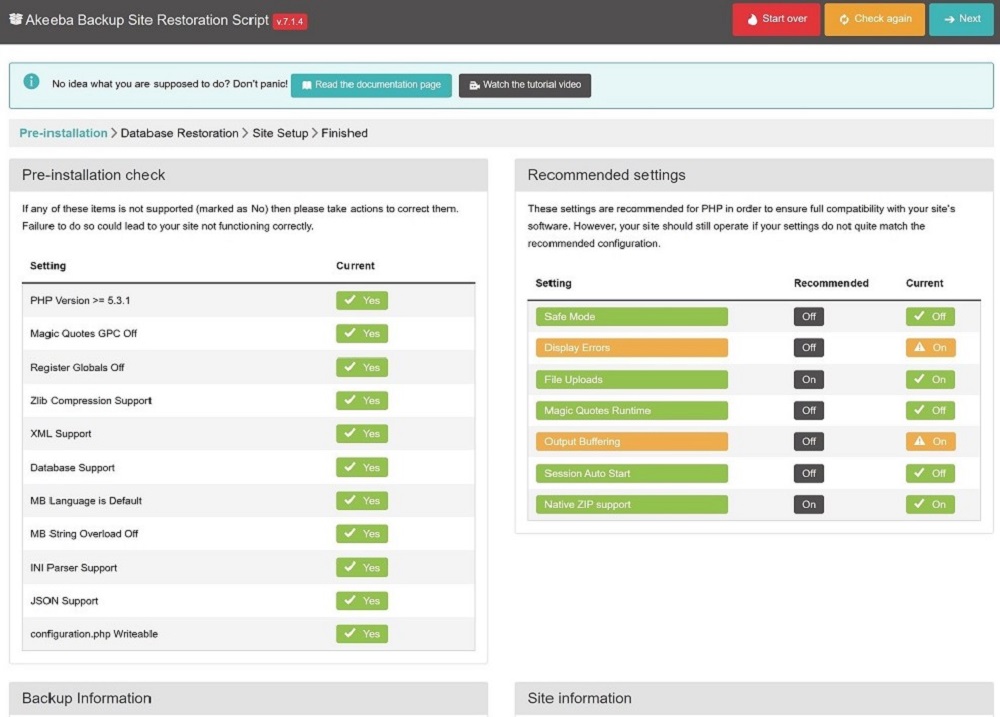
- The first page will check your server configuration. If you see any red ‘No’s, fix the issues accordingly before proceeding further. If not, then hit on Next.
- 第一页将检查您的服务器配置。如果你看到任何红色的‘不’,在继续之前相应地修复问题。如果没有,那就点下一个。
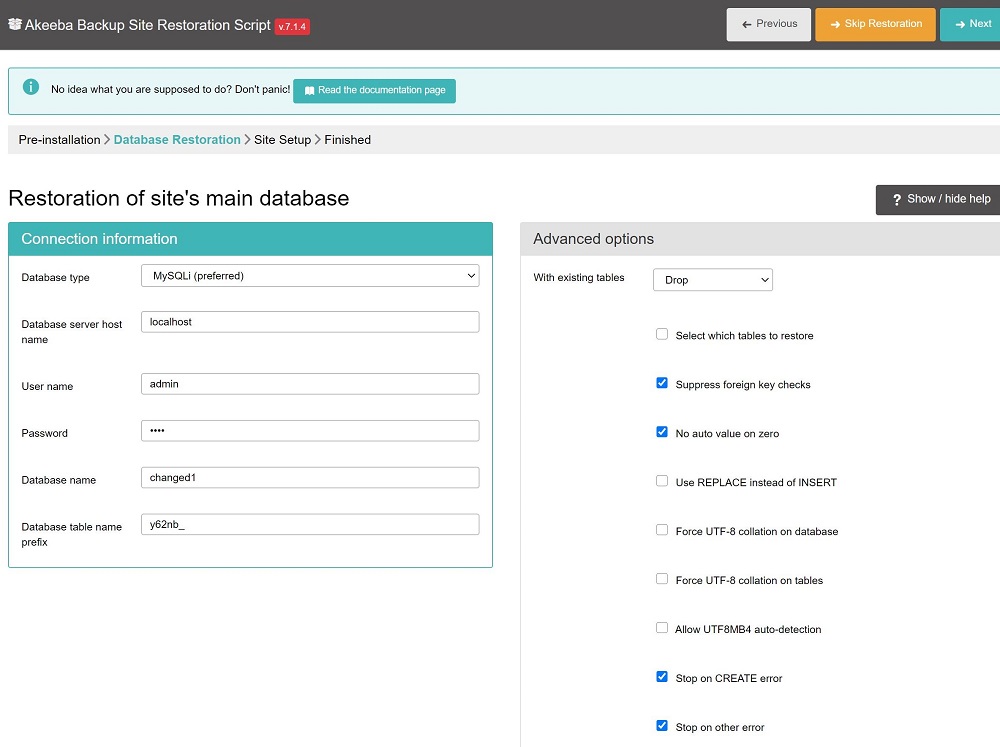
- The next screen will show you the database information from the original Joomla backup. Replace this with the new database information from step 5.
- 下一个屏幕将显示原始 Joomla 备份中的数据库信息。将其替换为步骤5中的新数据库信息。
- Click Next on the top and you will see a progress bar.
- 点击顶部的下一步,你会看到一个进度条。
- Once it is done, all that remains is to remove the installation folder just like the usual Joomla installation by clicking on “Clean Up”
- 一旦完成,剩下的就是像通常的 Joomla 安装一样通过点击“清理”来移除安装文件夹
After the restoration and clean up, you will be able to access your site’s frontend and backend.
在恢复和清理后,您将能够访问您的网站的前端和后端。
That’s it. You have successfully migrated your Joomla website to a remote server!
就是这样。您已经成功地将 Joomla 网站迁移到了一个远程服务器上!

 中文
中文
 English