How to Assign Permissions to Files and Folders through Group Policy
如何通过组策略为文件和文件夹分配权限
件夹分配权限
Assigning permissions for each file and folder individually can be complex and time consuming. To avoid going through the annoyances of changing permissions for a bunch of folders individually, we can use Group Policy to do it. In this article, you will see the process of assigning file and folder permissions across a domain through GPO. These instructions can be extremely helpful, and save your time if you have to assign permissions to a large number of systems with a common setup. Later in the article, you will also see the way to audit permission changes and to audit other changes in File Server through Lepide File Server Auditor (part of Lepide Data Security Platform).
为每个文件和文件夹单独分配权限可能是复杂和耗时的。为了避免为一堆文件夹单独更改权限的烦恼,我们可以使用组策略来完成。在本文中,您将看到通过 GPO 在整个域中分配文件和文件夹权限的过程。这些说明非常有用,如果您必须使用通用设置为大量系统分配权限,则可以节省时间。在本文的后面,您还将看到如何通过 Lepide File Server Auditor (Lepide Data Security Platform 的一部分)审计权限更改和审计 File Server 中的其他更改。
Steps to Assign File/Folder Permissions
分配文件/文件夹权限的步骤
- Go to “Start Menu” -> “Administrative Tools”, and click “Group Policy Management” to access its console.
- 转到“开始菜单”-> “管理工具”,然后单击“组策略管理”来访问控制台。
- In left panel of “Group Policy Management Console”, you have to create a new Group Policy Object or edit an existing Group Policy Object.
- 在“组策略管理控制台”的左侧面板中,必须创建新的组策略对象或编辑现有的组策略对象。
- To create a new GPO, right click “Group Policy Objects”, and select “New” from the context menu. It shows “New GPO” window. 要创建一个新的 GPO,右键单击“组策略对象”,然后从上下文菜单中选择“ New”。它显示“新 GPO”窗口

Figure 1: Creating a new GPO 图1: 创建一个新的 GPO - Enter a name for the Group Policy Object (GPO) (in this case it is Assigning Folder Permissions), leave “Source Starter GPO” as “(none)”.
- 输入组策略对象(GPO)的名称(在本例中为 assignment Folder Permissions) ,保留“ Source Starter GPO”为“(none)”。
- Right-click on the newly created “User Folder Permissions” GPO, and select “Edit GPO”. Group Policy Management Editor window appears on the screen
- 右键单击新创建的“用户文件夹权限”GPO,并选择“编辑 GPO”。“组策略管理编辑器”窗口将显示在屏幕上
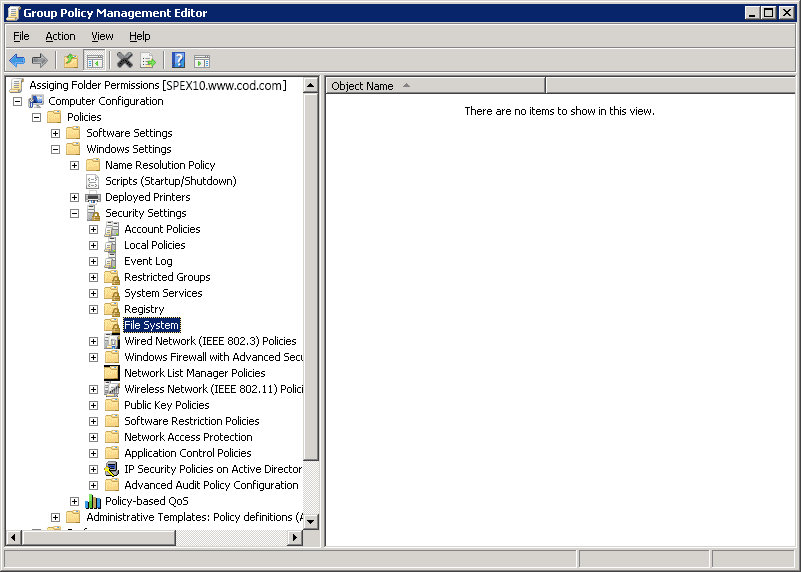
- Navigate to “Computer Configuration” -> “Policies” -> “Windows Settings” -> “Security Settings” -> “File System” 点击”计算机配置”->”策略”->”Windows 设置”->”安全设置”->”文件系统”

Figure 2: Navigate to File System 图2: 导航到文件系统 - Right-click on “File System” in the left pane and select “Add File…” It shows the following dialog box. 右键单击左窗格中的“文件系统”,然后选择“添加文件...”,它将显示以下对话框

Figure 3: Select file or folder which you want to assign permissions on 图3: 选择要分配权限的文件或文件夹 - Browse the folder or file that you wish to assign permissions on, and left click to select it. Click “OK”.
- 浏览您希望分配权限的文件夹或文件,然后左击选择它。单击“确定”。
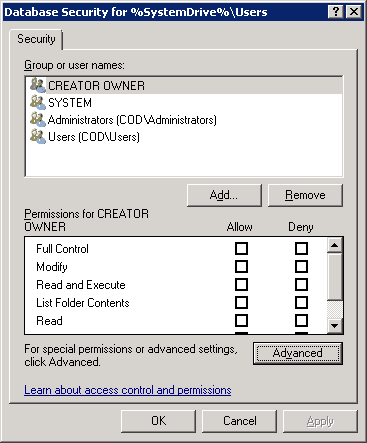
- “Database Security” window appears on the screen “数据库安全”窗口出现在屏幕上

Figure 4: Database security window 图4: 数据库安全窗口 - Click “Advanced” button to access “Advanced Security Settings” window. Stay on the “Permissions” tab that appears by default. 单击“高级”按钮进入“高级安全设置”窗口。停留在默认出现的“权限”选项卡上

Figure 5: Advanced security settings window 图5: 高级安全设置窗口 - On this tab, either select an existing user and click “Edit…” or click “Add…” to add a new user to the permissions.
- 在此选项卡上,选择一个现有用户并单击“编辑...”或单击“添加...”以向权限添加一个新用户。
- “Permissions Entry for…” dialog box opens up. Here, you will see that there is a list of permissions available for your users, and you can also choose where you want to apply those permissions. “权限项为...”对话框打开。在这里,您将看到有一个可用于您的用户的权限列表,您还可以选择要应用这些权限的位置

Figure 6: Permissions entry folders 图6: 权限条目文件夹 - Use the drop-down menu in the “Apply to” field to assign selected permissions to desired folders.
- 使用“ Apply to”字段中的下拉菜单将选定的权限分配给所需的文件夹。
- Check the permissions as needed. These are self-explanatory.
- 根据需要检查权限。这些是不言自明的。
- Click “OK” to apply the permissions. It takes you back to “Advanced Security” window.
- 单击“确定”应用权限。它会将您带回到“高级安全”窗口。
- Now, move to the “Auditing” tab. Under this tab, you can do audit settings for the folder, so that any change done to this folder or its permission will be audited. Configure the auditing settings as per requirement.
- 现在,移动到“稽核”选项卡。在此选项卡下,您可以对该文件夹进行审计设置,以便对该文件夹或其权限所做的任何更改都会进行审计。根据需求配置审核设置。
- Similarly, you can do ownership settings for the folder under “Owner” tab.
- 类似地,您可以为“ Owner”选项卡下的文件夹进行所有权设置。
- Once you have done “Permission”, “Auditing” and “Ownership” settings, click “OK” to close “Advanced Security…” window.
- 完成“权限”、“审计”和“所有权”设置后,单击“确定”关闭“高级安全...”窗口。
- Click “OK” to close “Database Security…” window. Next, you will see “Add Object” window. 点击“确定”关闭“数据库安全...”窗口。下一步,您将看到“添加对象”窗口

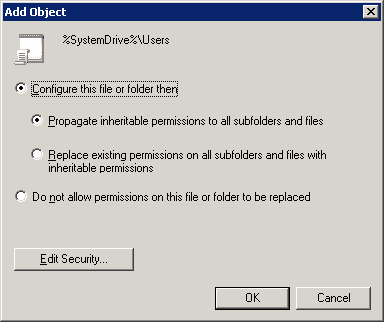
Figure 7: Add object window 图7: 添加对象窗口 - There are following options on the “Add Object” window: “添加对象”窗口有以下选项:
- Configure this file or folder then:配置该文件或文件夹,然后: Select this option to apply the settings. It contains the following two options. 选择此选项以应用设置。它包含以下两个选项
- Propagate inheritable permissions to all subfolders and files: Selecting this option means, all the subfolders and files will inherit permissions from the parent folder. In case of a mismatch or conflict, explicit permissions that were assigned to the subfolders or files will override the inherited permissions.
- 将可继承权限传播到所有子文件夹和文件: 选择此选项意味着,所有子文件夹和文件将继承来自父文件夹的权限。如果发生不匹配或冲突,分配给子文件夹或文件的显式权限将覆盖继承的权限。
- Replace existing permissions on all subfolders and files with inheritable permissions: This option will overwrite all the settings on all subfolders and files with the ones on the parent, so ultimately they will have identical permissions to the parent folder.
- 用可继承的权限替换所有子文件夹和文件上的现有权限: 这个选项将覆盖所有子文件夹和文件上的所有设置和父文件夹上的设置,因此最终它们对父文件夹拥有相同的权限。
- Do not allow permissions on this file or folder to be replaced: Use this setting for subfolders and files that you do not want to inherit permissions. For this, make an additional entry for those subfolders and files that will not inherit permissions e.g. let’s say you want the “A” folder to inherit permission but don’t want “B” folder to inherit permissions, in that case create an entry for the “B” folder.
- 不允许替换此文件或文件夹上的权限: 对不希望继承权限的子文件夹和文件使用此设置。为此,为那些不会继承权限的子文件夹和文件创建一个额外的条目,例如,假设你希望“ a”文件夹继承权限,但不希望“ b”文件夹继承权限,在这种情况下为“ b”文件夹创建一个条目。
NOTE: In this case, option “a” has been selected. Click “OK” to close the “Add Object” window.
注意: 在这种情况下,选项“ a”已经被选中。单击“确定”关闭“添加对象”窗口。
- Configure this file or folder then:配置该文件或文件夹,然后: Select this option to apply the settings. It contains the following two options. 选择此选项以应用设置。它包含以下两个选项
- Close “Group Policy Management Editor” window.
- 关闭“组策略管理编辑器”窗口。
- Right-click the domain you want to apply this GPO to, and then select “Link an Existing GPO…” option from the context menu. “Select GPO” window opens up. 右键单击要应用此 GPO 的域,然后从上下文菜单中选择“链接现有 GPO...”选项。“选择 GPO”窗口打开

Figure 8: Select the new GPO 图8: 选择新的 GPO - Select the new “Assigning Folder Permissions” GPO, then click OK.
- 选择新的“分配文件夹权限”GPO,然后单击确定。
- In the right pane, stay on the “Linked Group Policy Objects” tab that appears by default.
- 在右窗格中,保持在默认出现的“链接组策略对象”选项卡上。
- Right-click on the “Assigning Folder Permissions”, and select “Enforced” from the context menu. A confirmation message appears on the screen.
- 右键单击“分配文件夹权限”,然后从上下文菜单中选择“强制”。屏幕上会出现一条确认消息。
- Click “OK” to close the dialog box.
- 单击“确定”关闭对话框。
Using Lepide File Server Auditor to audit files and folders changes
使用 Lepide File Server Auditor 审计文件和文件夹更改
To audit files and folders using Lepide File Server Auditor, at first add the file server to the application, and configure audit settings.
要使用 Lepide File Server Auditor 审计文件和文件夹,首先将文件服务器添加到应用程序中,并配置审计设置。
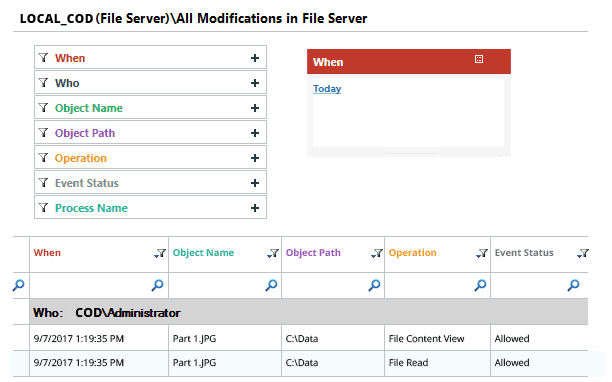
In the following screen, you can see the report on all modifications made in file server that shows all changes made to files and folders including their permissions. All the relevant information about auditing like who changed what, when and where is shown in a single record. Details pane gives further information about the record.
在下面的屏幕中,您可以看到关于在文件服务器中所做的所有修改的报告,其中显示了对文件和文件夹所做的所有修改,包括它们的权限。有关审计的所有相关信息,如谁更改了什么、何时、何地显示在单个记录中。“详细信息”窗格提供有关记录的进一步信息。

Conclusion
总结
In this article, you have seen the way to assign files and folders permissions through GPO. You have also seen the auditing of changes made to files and folders using Lepide File Server Auditor. The solution has pre-defined file and folders modification and permission modification reports that make enterprises safe and compliance-ready.
在本文中,您已经看到了通过 GPO 分配文件和文件夹权限的方法。您还看到了使用 Lepide File Server Auditor 对文件和文件夹所做更改的审计。该解决方案具有预定义的文件和文件夹修改和权限修改报告,使企业能够安全和遵从。

 中文
中文
 English
