The new Battery Saver feature goes a long way toward helping you extend battery life on your Windows 10 mobile device. See how Power Options can take you even further.

In my previous two articles, I showed you how to use Windows 10's new Battery Saver feature to configure, monitor, and conserve your mobile device's battery power. After those articles were published, I received email from several readers who asked whether the Battery Saver feature superseded the need to use the Power Options/Power Plans found in previous version of Windows. The answer is no. In fact, both the Power Options and Power Plans features exist in Windows 10 right alongside the Battery Saver feature. This means that you can use all of them in concert to help conserve and extend battery power on your Windows 10 devices. Let's take a closer look.
Getting started with Power & Sleep Settings
When you access Battery Saver from the battery icon on the Taskbar, the battery notification screen will provide a link to the Power & Sleep Settings, as shown in Figure A. When you follow that link, you'll see the Power & Sleep page shown in Figure B.
Figure A
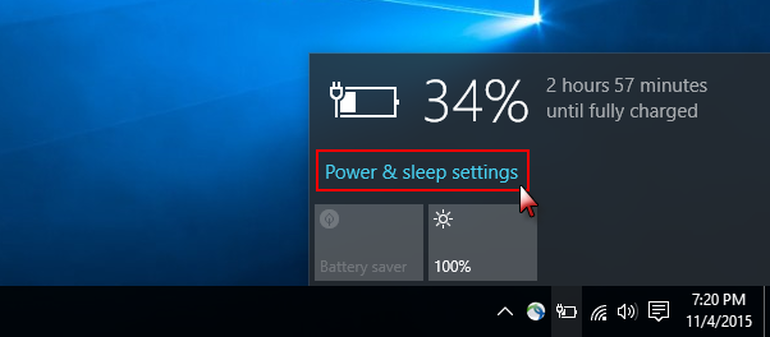
You can access Power & Sleep Settings from the battery notification screen.
Figure B
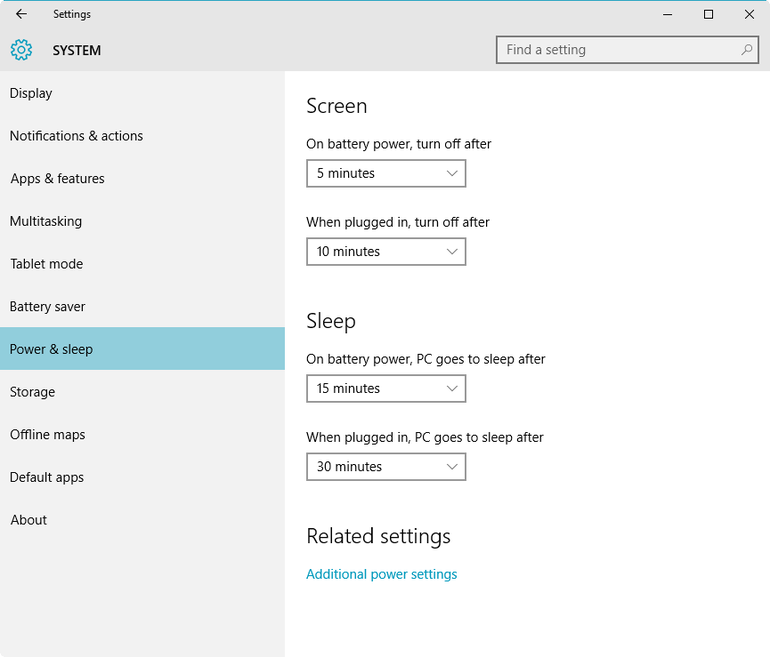
The Power & Sleep page provides you with two controls for conserving battery power.
As you can see, the Power & Sleep page offers two sections and four controls--two of which pertain to conserving battery power when your device is running on battery but not being used. In the Screen section you can configure how long your device will be in an idle state before the system turns off the screen. In the Sleep section you can choose how long you want your device be in an idle state before the system goes into sleep mode.
The power plans
If you follow the Additional Power Settings link on the Power & Sleep page, you'll access the Power Options tool in the Control Panel, shown in Figure C. By default, Windows comes with three power plans. However, since this Dell laptop comes with its own battery life extension features, there is an additional Dell power plan that has been factory tuned for this laptop.
Figure C
The Power Options tool in the Control Panel provides several configurable power plans.
As you can see, each power plan is accompanied by a brief description of its energy savings and performance. The Balanced and the Dell power plan are designed to offer full performance when you need it and to save power during periods of inactivity. The Power Saver power plan will save power by reducing system performance and is designed to help laptop users get the most from a single battery charge. On the other end of the spectrum is the High Performance power plan, which is designed to maximize system performance and responsiveness but will do almost nothing to save power. As such, from the standpoint of conserving battery power on a Windows 10 device, you might just want to ignore the High Performance power plan.
Editing plan settings
Adjacent to each power plan, you'll notice the Change Plan Settings link. Clicking this link takes you to the Edit Plan Settings page, shown in Figure D. The Edit Plan Settings page provides the same basic settings as the Power & Sleep page; however, there is an additional setting that can help conserve battery power: Adjust Plan Brightness.
Figure D
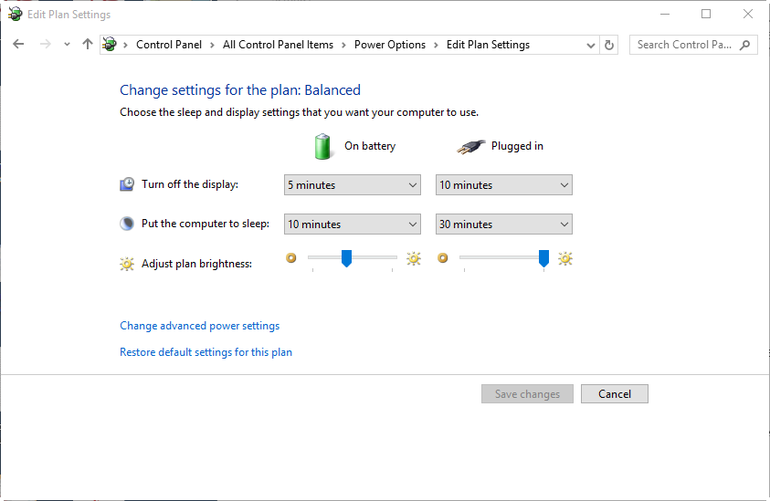
The Edit Plan Settings page has one more configurable option than the Power & Sleep page.
As you can see, there are two categories: On Battery and Plugged In, under which you can alter settings. To conserve the amount of power used by the display on a mobile device, you adjust the amount of idle time that must elapse before the display is turned off. Of course, you can also adjust the amount of idle time that must elapse before the system is put into sleep mode. The dropdown menus for both the display and sleep options provide you with plenty of timing choices, as shown in Figure E.
Figure E
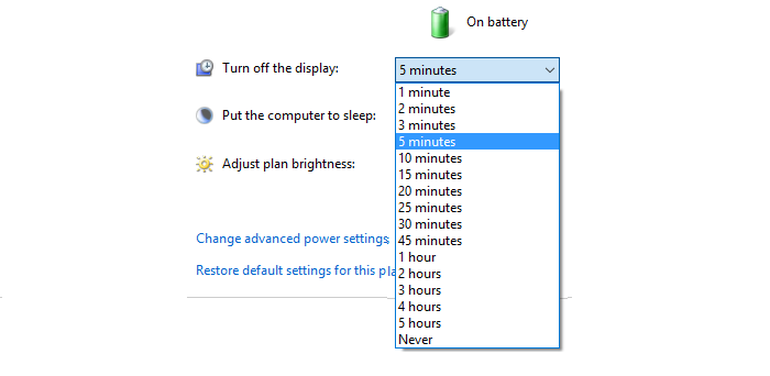
You can choose anywhere from 1 minute to Never.
In the case of my example Dell laptop system, I decided on five minutes as the amount of idle time that should elapse before the display is turned off. I figure that if I am away from this system for at least five minutes, it will be good to turn off the display. You might think it would be inconvenient to have such a short time period. However, I've found that the screen will dim a few moments before it actually turns off. So if I am still working-say, reading something on the screen--when it dims, I can press any key and the display will revert to its original brightness setting. (I find that it is best to use an inert key, such as Shift, Alt, or Ctrl, when waking up the display to avoid inadvertently changing or activating something.) Even when the screen does turn off, a simple key press brings it back to life rather quickly.
The Adjust Plan Brightness slider lets you adjust the amount of power that is consumed by the display when it is in use. As you can see, I have mine set to 40%. However, if I'm working in a brighter environment, such as a room with windows or fluorescent light, I usually drop the brightness level down to between 25% and 30% and can still see everything on the screen just fine.
You'll also notice that I chose 10 minutes as the amount of idle time that must elapse before the computer is put into sleep mode. I've found that using five and 10 minute settings for display and sleep provides a nice equilibrium between power savings and ease of use. If this laptop is idle between five and 10 minutes, the screen turns off to save battery power, but I can get back to work with a quick press of a key. If I am away longer than 10 minutes, the computer goes to sleep to save even more battery power, but to get back to work I must press a key and then sign in.
Adjusting Advanced settings
If you want more granular control, you can click the Change Advanced Power Settings link on the bottom left of the Edit Plan Settings page. You'll then see the Power Options dialog box with a single tab titled Advanced Settings, as shown in Figure F.
Figure F
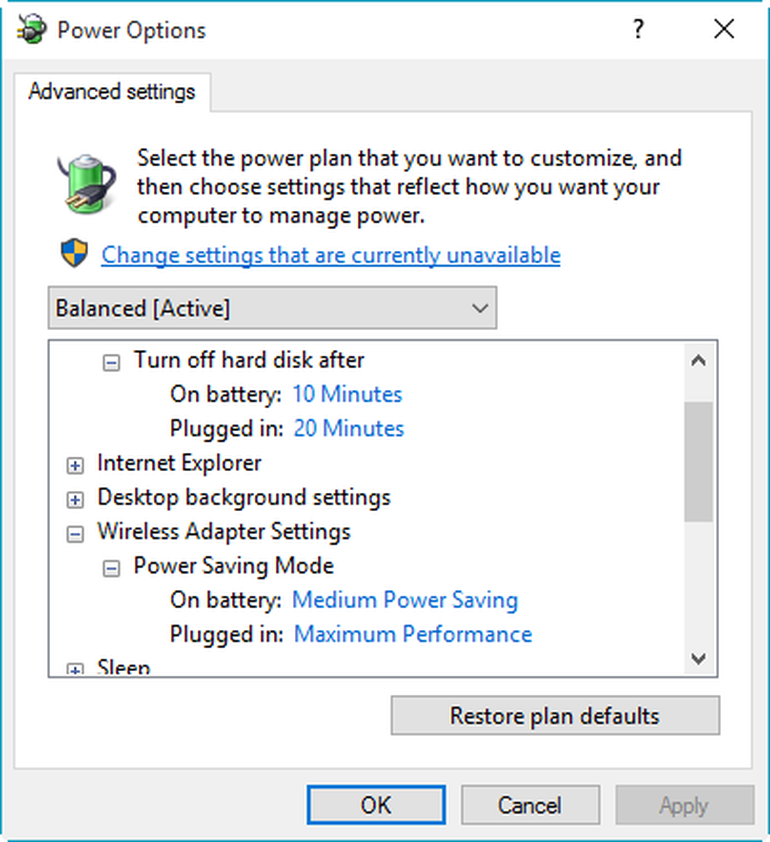
The Advanced Settings dialog box provides you with specific controls.
In addition to the more common power settings, there is a host of power-consuming features and devices for which you can adjust settings, such as the hard drive, wireless adapters, and USB devices. I'll just cover a few of the more significant Advanced settings.
Hard Disk: Turn Off Hard Disk After
If you have a solid state drive (SSD), you needn't worry about this setting. Even if you don't, the small spinning hard disks in a laptop really don't consume that much power. Regardless, you can squeeze a bit more power out of the laptop battery by turning off the hard disk. Keep in mind that this setting should be for a shorter time period than for putting the machine to sleep. For example, since I chose 10 minutes for putting the computer to sleep, I chose eight minutes for turning off the hard disk.
Wireless Adapter Settings: Power Saving Mode
On the Wireless Adapter Settings: Power Saving Mode dropdown menu, you'll find four choices: Maximum Performance, Low Power Saving, Medium Power Saving, and Maximum Power Saving. Before you make a choice here, it's important to consider that the amount of power you'll save by adjusting this setting will vary depending on the wireless card in your laptop. Also keep in mind that performance will usually suffer with higher power savings. I've found it to be safest to go with the Medium Power Saving setting.
Sleep
Under the Sleep branch, you'll find Sleep After, Allow Hybrid Sleep, Hibernate After, and Allow Wake Timers. I already covered the Sleep After setting. Allow Hybrid Sleep really won't really help save battery power and in fact is set to off on all the power plans. I recommend just leaving it off. By default, Hibernate After is set to 180 minutes on all but the High Performance power plan. I recommend leaving it at the default as well. Allow Wake Timers will permit things like Windows Update to bring a system back to life. However, Allow Wake Timers is disabled on all the power plans, so I don't recommend that you enable it on a laptop running on battery.
USB Settings: USB Selective Suspend Setting
By default, USB Selective Suspend Setting is enabled. This allows the USB port drivers to shut off the power to USB devices that are idle. This will save power because USB devices really don't need power the entire time they're connected to your laptop.
Processor Power Management
Under the Processor Power Management branch, you'll find Minimum Processor State, Maximum Processor State, and System Cooling Policy. The Minimum Processor State setting allows you to choose a percentage of power to allot to the processor when it is inactive or performing minimal tasks. By default, the minimum setting is 5%, which will indeed save power. However, if and when processing power is required, the maximum setting of 100% ensures that the task at hand will have all the available processing resources at its disposal.
System Cooling Policy covers the amount of power the fan requires by altering the way that the processor functions. There are two states: Active and Passive. Active increases the fan speed before slowing the processor. Passive slows the processor before increasing the fan speed. You'll get the best performance by leaving the System Cooling Policy set to Active.
Evaluate with the PowerCfg utility
While you can always evaluate the effectiveness of your Power Options settings by using your system over time, Windows provides you with another way via the PowerCfg utility. When you run this tool, it will evaluate the efficiency of your Power Plan settings and generate a detailed report.
To use the PowerCfg utility, you'll need to open an Administrator Command Prompt, which you can do by right clicking on the Start button and selecting the Command Prompt (Admin) command. Then, type the command
powercfg -energy
After you press [Enter], the PowerCfg utility will begin analyzing your system's Power Options settings. After a minute or so, you'll see a report brief, as shown in Figure G, and will be prompted to open the report titled energy_report.html for more details.
Figure G
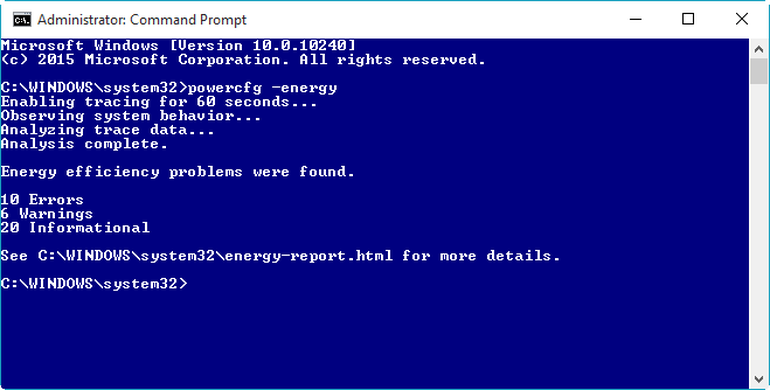
When the PowerCfg utility finishes analyzing your system's Power Options settings, you'll be prompted to open the report file for more details.
Just type energy-report.html at the prompt to launch Microsoft Edge and open the HTML report file.
When the report opens, as shown in Figure H, you'll see a header with basic system information followed by color-coded sections that indicate the severity of the problems that were detected. Pink indicates errors, yellow indicates warnings, and white indicates general information. You can use this report to make adjustments to your power plan settings.
Figure H
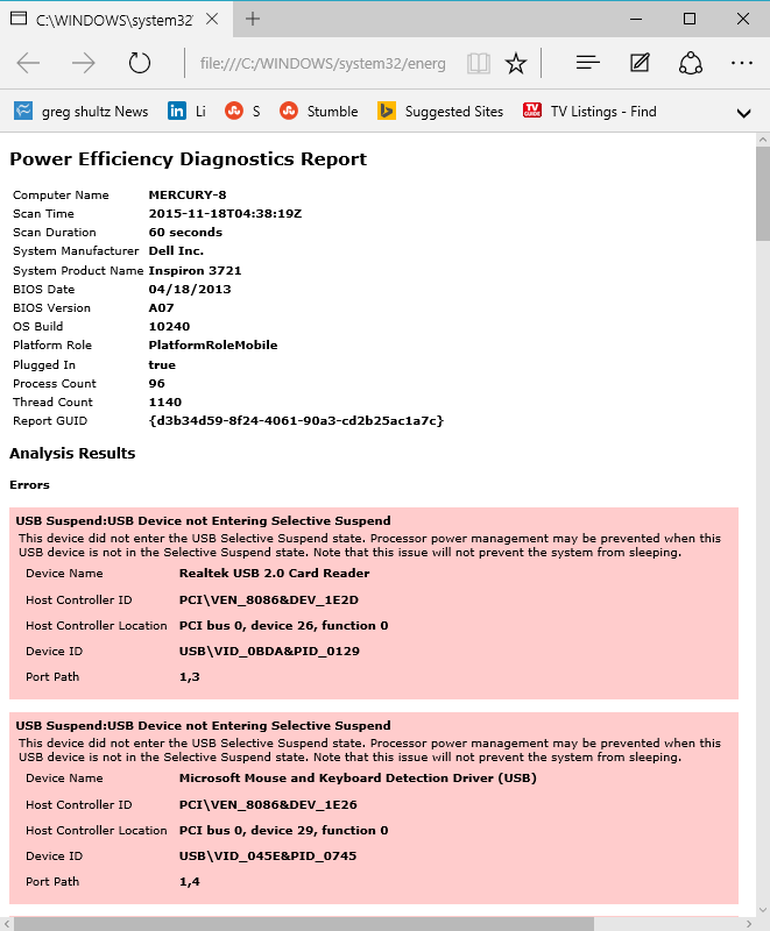
The report is divided into three color-coded sections that provide details on the efficiency of your system's energy usage.
To delve even deeper into the power management information contained in the report, download the "Using PowerCfg to Evaluate System Energy Efficiency" document from the Windows Hardware Dev Center Archive. This document provides additional information on how to use the PowerCfg command, as well as detailed explanations of how to understand and solve the reported energy efficiency problems and warnings.
What's your take?
Are you using Windows 10 on a mobile device? Have you tweaked the Power Options settings to get more out of a single battery charge? Will you use the PowerCfg command-line tool to evaluate the efficiency of your power plan settings? Share your opinion in the discussion thread below.

 中文
中文
 English
