Windows Subsystem for Linux (WSL) brings the convenience of native Linux functionality to Windows Server. You have access to a fully functional Linux kernel in the distribution of your choice embedded right where you have instant access without needing to rely on a heavy virtualization layer or a thick emulator. This article focuses on WSL in Windows Server 2022 as the current version, but includes notes for WSL on Windows Server 2019.
[citationic]
Overall, Microsoft maintains decent documentation on WSL, which you can always access at aka.ms/wsl. However, their directions for installing distributions from APPX on Windows Server have some clarity problems and may not work for you. If you want, you can try them. The steps shown in this article have all been verified functional as of the date of publication/most recent update.
Install WSL Using DISM
You can install WSL on Windows Server using the command-line DISM utility in two ways. The first uses an elevated command line and the dism.exe program. Remember that feature names in DISM are case sensitive. If you are on Windows Server 2019 or you do not wish to use WSLv2 on Windows Server 2022, you can omit the references to VirtualMachinePlatform. Note that because Windows Server 2022 always defaults to version 2 for WSL, attempting to install a distribution without this component will usually result in error code 0x8004032d. The sections in this article on installing distributions show how to set the default version to 1.
You can also use PowerShell:
You can use Install-WindowsFeature or its alias of Add-WindowsFeature, however, it only works for the base WSL package. If you have Windows Server 2022 and want to use WSLv2, then you will still need to add the “VirtualMachinePlatform” package as shown above.
If the method you use does not prompt for reboot, you can initiate one with
. in PowerShell or
at any prompt. Afterward, you have the WSL infrastructure but no distributions. Skip the next installation section for instructions.
Not Recommended: Install WSL Using Pre-placed Stub
With some caveats, you can sometimes install Windows Subsystem for Linux on Windows Server 2022 the same way that you can on Windows 10 or Windows 11. Just open an elevated command-line and run:
This may not notify you afterward, but it requires a reboot. You can initiate from the command line with
.
When it works, it does so because Windows Server 2022, like the desktop editions of Windows with more recent updates, includes just enough of the Windows Subsystem for Linux to operate the installer. Once this completes, you might have the framework necessary to run Linux distributions. However, it may set the system to default to version 2 but miss a vital component that allows for anything beyond version 1, and it does not include any distributions. Instructions for adding distributions appear after the remaining installation sections. Sometimes, it doesn’t even actually enable the feature! To save time troubleshooting any of these problems, use the DISM steps in the next section.
Not Recommended: Install WSL Using Server Manager
You can also use Server Manager to install the base component of WSL. This will not install the “VirtualMachinePlatform” component, so you can’t use WSLv2. That component does not appear anywhere in the Server Manager UI, so you’ll need to follow the DISM steps. This does not apply on Windows Server 2022 or when you don’t want to use WSLv2 on Windows Server 2022.
From Server Manager’s start page, use the Add Roles and Features link. Step through the wizard to the Features page and check the option for Windows Subsystem for Linux.
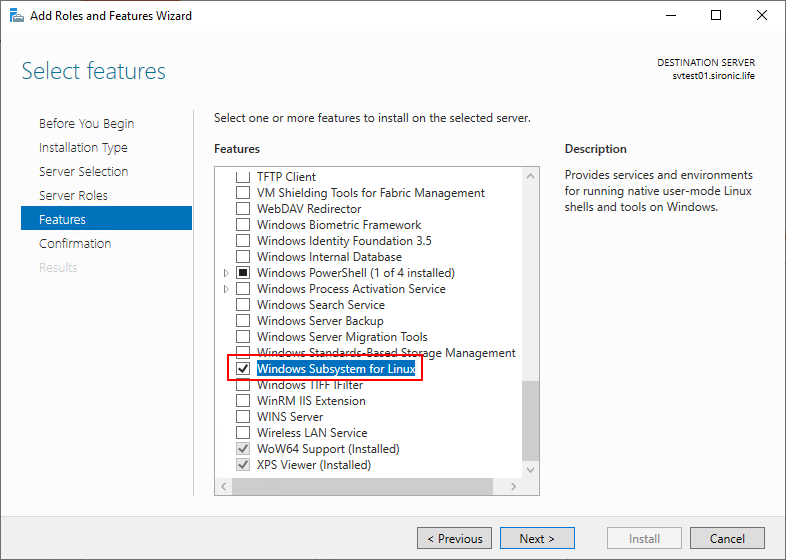
Continue through the wizard. If you check the box for automatic restart, then Windows Server will take care of it. Otherwise, you can restart manually at your convenience.
After the restart, proceed to the next section to learn how to add a Linux distribution.
Acquiring Packaged Linux Distributions for WSL
Microsoft provides multiple distributions ready for use with WSL. On a typical desktop installation of Windows, you would install them directly from the Windows Store. Windows Server does not provide access to the Windows Store. Therefore, you’ll need to download distributions and install them manually.
Before downloading anything, decide where you want to house your Linux distributions. You can use something simple, like C:\WSL. Create the directory with default options. You can do this in Windows Explorer or at a command line:
You can download from Microsoft’s site. You should not use a production server for general Internet access. Ideally, a server won’t even have an installed Internet browser. Instead, access the site from a desktop installation of Windows and use a secured channel to transfer it to your server environment. Rather than repeat everything from the Microsoft site here, you can just follow this link: https://learn.microsoft.com/en-us/windows/wsl/install-manual#downloading-distributions.
A couple of notes on what you’ll find:
- Notice that each of the links includes an aka.ms shortcut URL, such as https://aka.ms/wslubuntu for the current Ubuntu distribution.
- Below the links, you can find examples for using PowerShell and the command-line utility cURL to download.
The site delivers distributions as appx (package application) files, but as mentioned during the intro of this article, those directions may not work. The next section shows how to extract them for use.
Quick, Foolproof WSL Distribution Setup Directions
This section contains the shortest possible directions. If you have already tried to follow the Microsoft instructions and a bunch of Internet solutions and learned a lot but still failed, then you will probably only need this section. It makes a lot of assumptions about your knowledge. If you find these instructions too simplistic, skip past and use the longer versions afterward.
- Download the major .appx file for the distribution
- If you used a browser, remember to unblock the file (Unblock-File)
- Rename the .appx to .zip. If it’s an .appxbundle file, then you’ll still rename to .zip.
- Extract the files from that zip
- If the extracted files have more appx files for the distribution, the source was probably an appxbundle. Determine which of the contained appx files you want to use for your distribution, rename that to zip, and extract its files.
- Optional: Register that appx with Add-AppxPackage (this will not work on any core mode installation and does not work and is not necessary on any edition of Windows Server 2019)
- Rename the appx that you just registered to .zip
- Extract the files from that zip. You specifically need the distribution executable (e.g., ubuntu.exe) and the install.tar.gz
- On Windows Server 2022, you may have instances where you can’t or don’t want to use WSLv2, but WSL wants to run v2 by default. Switch to version 1 with
wsl --set-default-version 1. If you expected WSLv2 to work, make sure that you installed the “VirtualMachinePlatform” optional feature (discussed in the DISM section near the beginning of the article).
- Run the distro’s executable
- Delete the extracted files except for the distro executable, the rootfs folder (if present), and the temp folder (if present)
Going forward, you can just run that same executable to start this distribution. You can add its location to the path to initiate it from anywhere. After it has executed once, it will also appear as one of the options in
(Windows Server 2022+) or
(Windows Server 2019).
Quick Walkthrough: Linux Distro Installation for WSL on Windows Server 2019
These steps show the exact process to start an installation of the current Ubuntu distribution in WSL on Windows Server 2019 fresh install, Standard edition, core mode, updated via online Windows Update to available patches on November 24, 2023. They will also work on WS2019 with the desktop experience.
- If not already in PowerShell, start PowerShell from an elevated command prompt (
powershell.exe)
-
Install-WindowsFeature -Name Microsoft-Windows-Subsystem-Linux
-
cd $env:USERPROFILE
-
cd .\Downloads\
-
Invoke-WebRequest -UseBasicParsing -OutFile ubuntu_current.zip -Uri https://aka.ms/wslubuntu
-
Expand-Archive -Path .\ubuntu_current.zip .\ubuntu_current
-
cd .\ubuntu_current
-
Rename-Item .\Ubuntu_2204.1.7.0_x64.appx .\Ubuntu_2204.1.7.0.zip
-
mkdir C:\WSL\Ubuntu
-
Expand-Archive .\Ubuntu_2204.1.7.0.zip C:\WSL\Ubuntu
-
cd C:\WSL\Ubuntu
- .
\ubuntu.exe
This will start an install process, then ask you to set up the credentials to use in this distribution.
Because Windows Server 2019 cannot use WSL2, only a subset of the instructions that you find for wsl.exe will work. Use
to show what you can use. For the other functions, such as removing a distribution, use wslconfig.
will show its options. For example, to remove the distribution that you just set up, run
. If you do that, you can immediately run the
again to reinstall it, provided that you left the install files intact.
If you want to clean up your directory tree after installation, the C:\WSL\Ubuntu location mentioned in the walkthrough only needs the
file, the
folder, and the
folder. If you delete the temp folder, your next run of the distribution will recreate it. Do not try to remove the rootfs folder as it contains your distribution and has file names that the NTFS tools can’t handle. If you try to remove the folder, it will partially work and complain about something, usually an undeletable aux file. Use
instead. If you’ve already wrecked it and you can’t remove the folder, try going to an elevated command prompt (not PowerShell) and run the following:
.
Quick Walkthrough: Linux Distro Installation for WSL on Windows Server 2022
These steps show the exact process to start an installation of the current Ubuntu distribution in WSL on a Windows Server 2022 fresh install, Standard edition, core mode, updated via online Windows Update to available patches on November 24, 2023. This follows the pattern of the previous section in which you manually retrieve the appx package from the Microsoft site even though you now have the online option to perform this automatically. We chose this technique because, except for the download part, it will work for servers that do not have an Internet connection.
These steps will also work on WS2022 with the desktop experience.
- Start an elevated PowerShell session (
powershell.exe) -
Enable-WindowsOptionalFeature -Online -FeatureName Microsoft-Windows-Subsystem-Linux, VirtualMachinePlatform
- If prompted, allow the computer to restart
- If you had to restart, return to an elevated PowerShell prompt.
-
cd $env:USERPROFILE
-
cd .\Downloads\
-
Invoke-WebRequest -UseBasicParsing -OutFile ubuntu_current.zip -Uri https://aka.ms/wslubuntu
- Optional: If running a Desktop Experience installation of Windows Server, see the second note in the next sub-section before proceeding
-
Expand-Archive -Path .\ubuntu_current.zip .\ubuntu_current
-
cd .\ubuntu_current
-
Rename-Item .\Ubuntu_2204.1.7.0_x64.appx .\Ubuntu_2204.1.7.0.zip
-
mkdir C:\WSL\Ubuntu
-
Expand-Archive .\Ubuntu_2204.1.7.0.zip C:\WSL\Ubuntu
-
cd C:\WSL\Ubuntu
- If you prefer to use WSL v1 or must because of a hardware limitation, run the following:
wsl --set-default-version 1
- .
\ubuntu.exe
This will start an install process, then ask you to set up the credentials to use in this distribution.
If you want to clean up your directory tree after installation, the C:\WSL\Ubuntu location mentioned in the walkthrough only needs the
file, the
folder, the fsserver file, and the
folder. If you delete the temp folder, your next run of the distribution will recreate it. Do not try to manually remove the rootfs folder as it contains your distribution and has file names that the NTFS tools can’t handle. If you try to remove the folder, it will partially work and basically just wreck the whole thing. Use
instead. If you’ve already wrecked it, try going to an elevated command prompt (not PowerShell) and run the following:
.
Notes for WSL On Windows Server 2022
The above directions used a core mode installation, which varies from the desktop experience in two major ways.
First, the steps will work just fine on the desktop experience, but the core mode lacks several capabilities: No use of
,
, or any
functionality. All these result in a vague
message. You also can’t install the most recent WSL recent from the Github page, apparently because of the same anonymous missing component.
Second, on desktop experience, you can use Add-AppxPackage on the internal APPX component before renaming it to ZIP at step 11. Example:
. If you do this and then follow the rest of the directions, the system creates a folder for the APPX package under your user profile (ex: C:\Users\Administrator\AppData\Local\Packages). The
and
folders for the distribution will appear there. You can then delete everything in the place where you extracted the files (ex: C:\WSL\Ubuntu in the directions above) except for the distribution’s executable (ubuntu.exe in the directions). You can even move the executable anywhere you like.
If you get errors trying to run Add-AppxPackage on the distribution package that mention dependency failure, install the Universal Windows Platform desktop component first. This will only work with the desktop experience, not on core.
Installing an APPX WSL Distribution on Windows Server
Here begin the longer instructions for installing a Linux distribution from APPX on Windows Server. This will show the process more in-depth than the quick directions in the preceding two sections and will use Windows Server 2022 with the desktop experience instead of core.
From this point onward, the directions assume that you have installed WSL, created a location to store your distributions, and have acquired at least one APPX-packaged distribution. These steps will use C:\WSL as the root for WSL distributions, so modify them to match what you decided to use.
Preparing Windows Server 2022 to run Linux Distributions
Before you start, consider two things.
First, WSL on Windows Server 2022 always wants to run version 2 distributions. If you didn’t enable the “VirtualMachinePlatform” or your hardware just doesn’t support it, WSL will refuse to install distributions. You can follow the instructions in DISM section at the beginning of the article to enable the missing component.
Alternatively, you can tell WSL to use version 1. At an elevated command prompt, run:
From this point forward, all Linux distributions will install as version 1. It will not impact existing distributions. You can change the default version and the version of an installed distribution at any time.
Second, update WSL. Unfortunately, this does not work on core installations of Windows Server 2022 or any installation of Windows Server 2019. For offline servers, you can get the bits from Github. For online servers, you can update right from the command prompt.
At an elevated command prompt, run:
This will retrieve and install the most current WSL bits. If it fails because the server can’t access the Internet, WSL will still operate your distribution.
Extracting and Installing the Linux APPX
This example shows an openSUSE distribution instead of Ubuntu to shake things up a bit. It downloads as an APPX file, which the article has talked about all along. The Ubuntu distribution in the preceding sections uses a nested delivery technique. If you download that one using a web browser, you’ll get an “appxbundle” file. You rename an APPXBUNDLE to ZIP just like the APPX example shown here, then open that archive to find nested APPX files. Select the one you want (usually by architecture, ex: x64 or ARM), extract it, and use that APPX as the following example shows.
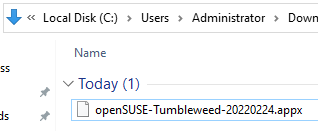
To start, rename the downloaded file so that it has a .ZIP extension instead of .APPX (or .APPXBUNDLE).
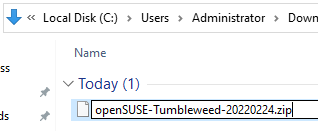
Explorer will warn about changing the extension. Click Yes if you get that. You can then double-click the newly renamed ZIP. Inside, you’ll find multiple files, but you only need the application (EXE) and the install.tar.gz files.
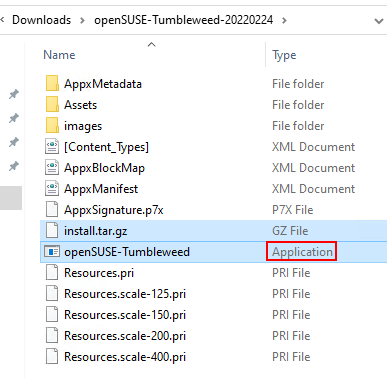
If you configured Explorer to show extensions, then can quickly spot the executable by the exe extension. Otherwise, it should distinguish itself by using the name of the Linux distribution. Extract these two files to your desired operating location (ex: C:\WSL).
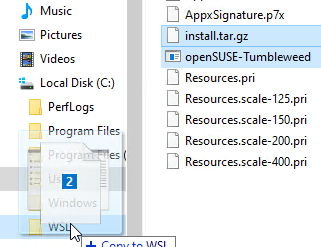
Now, you can double-click the extracted executable or run it from an elevated command prompt. Be warned that SmartScreen might not like it!
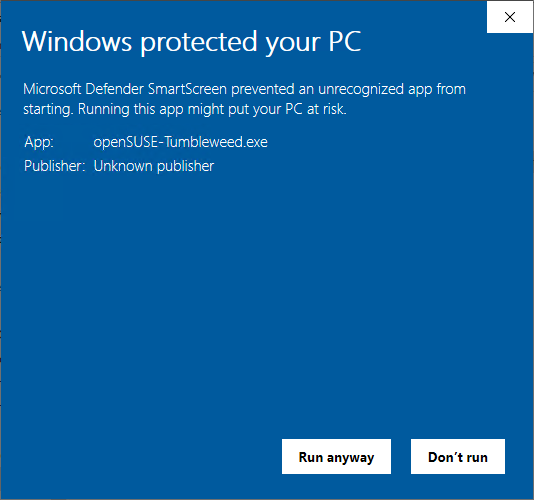
You can click More Info and Run anyway to get past this warning.
The distribution will then perform its installation routine.

When you exit from the session, you will notice that the installer created some supporting files, either in the same location or under your user’s profile.
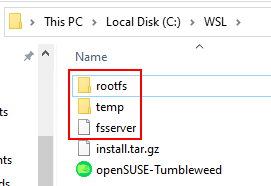
If using WSLv2, you will have a VHDX file instead of the rootfs folder. The temp folder will automatically recreate when necessary on each run of the distribution. Distributions may create their own files, such as the fsserver item that openSUSE created here. Leave those items and the executable that runs the distribution. You can delete the install.tar.gz file and any other support files that came from the APPX.
Going forward, you can run this executable or use the
command to start the distribution.
Adding the Distribution to the Path
The wsl.exe file lives in C:\Windows\System32, so you can invoke it from anywhere. With nothing else specified, doing so will start the default distribution. You can also pass the name of an installed distribution using
and it will start that one. This is how you would run a command inside your distribution without loading the entire thing (ex
). Such usage exceeds the intent of this article, so check the documentation link at the top for more information.
If you’d rather start your distribution by its executable, (ex ubuntu.exe), then you can add its location to your path. Microsoft’s document lists a convoluted way via PowerShell that did not work for me. Instead, use the age old technique at an elevated command prompt (not PowerShell):
Now you can just run
from any command prompt and it will start up your distro.
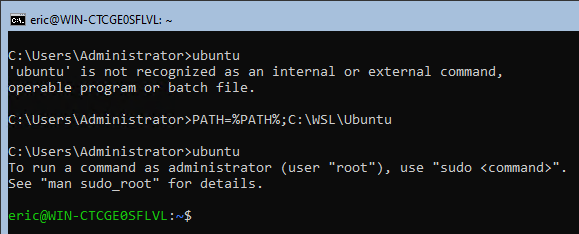
Want another cool trick? You can rename the exe and it will continue to work just fine.

This does not change the behavior of wsl.exe in any way. You would still invoke this distribution with
.
Go Forth and Linux on Windows Server
Future articles here on Project Runspace will use WSL for activities such as certificate services. Whatever your purpose, you now have the tools you need to run Windows Subsystem for Linux on your Windows Servers.

 中文
中文
 English
