English
 中文
中文 How to Delete a Windows Service in Windows 10/11 and Earlier
如何删除 Windows 10/11及更早版本的 Windows 服务
Have you come across a situation where uninstalling software leaves its Service or driver entries in the registry, and Windows tries to load them at every boot, fails, and logs the error to the System Event log at every startup?
您是否遇到过这样的情况: 卸载软件将其服务或驱动程序条目留在注册表中,Windows 试图在每次启动时加载它们,但失败了,并在每次启动时将错误记录到系统事件日志中?
This article tells you how to delete an orphaned service in Windows 10 (and earlier) using the registry, SC.exe command-line, PowerShell, or Autoruns. Before proceeding further, create a System Restore Point and take a complete Registry backup.
本文将告诉您如何使用注册表、 SC.exe 命令行、 PowerShell 或 Autoruns 来删除 Windows 10(以及更早版本)中的孤立服务。在继续之前,请创建系统还原点并进行完整的注册表备份。
If you find that no dependents exist for a service, you can delete the leftover or unwanted Service in Windows using one of the following methods.
如果发现某个服务不存在依赖项,可以使用以下方法之一删除 Windows 中的剩余服务或不需要的服务。
How to Delete a Service in Windows? 如何在 Windows 中删除服务?
You can delete a service using the built-in SC.exe command-line, the Registry Editor, PowerShell, or a utility like Autoruns. Follow one of these methods:
可以使用内置的 SC.exe 命令行、注册表编辑器、 PowerShell 或 Autoruns 等实用程序删除服务。遵循以下方法之一:
Using the SC command 使用 SC 命令
The SC.EXE command-line tool in Windows can be used to create, edit, or delete Services. To delete a service in Windows, use the following command-line syntax from admin Command Prompt:
Windows 中的 SC.EXE 命令行工具可用于创建、编辑或删除服务。若要删除 Windows 中的服务,请使用管理命令提示符中的以下命令行语法:
sc delete service_name
Where service_name refers to the short name of the service, instead of its display name. To find the short name, open Services MMC and double-click a service.
其中 service_name 指的是服务的简称,而不是其显示名称。要查找短名称,请打开 servicemmc 并双击一个服务。
- Example 1: Google Update Service (
gupdate) is the display name, andgupdateis the short name. - 示例1: googleupdate Service (gupdate)是显示名称,而 gupdate 是短名称。
- Example 2: Dell SupportAssist ( 示例2: Dell SupportAssist (
SupportAssistAgent) is the display name, and )是显示名称,而SupportAssistAgentis the short name. 是个简称

Another way to find the short name of a service is by using this command-line:
查找服务简称的另一种方法是使用以下命令行:
sc query type= service | more
The above command lists all the services along with the service (short) name and the display name.
上面的命令列出了所有的服务以及服务(short)名称和显示名称。
Or, if you know the display name, you can find the service name using this command:
或者,如果您知道显示名称,您可以使用以下命令查找服务名称:
sc getkeyname "service display name"
which in this example is:
在这个例子中是这样的:
sc getkeyname "Google Update Service (gupdate)"

Once the service short name is obtained using any of the above methods, use this command to delete the Service:
使用以上方法获得服务简称后,使用以下命令删除服务:
sc delete test
You’ll see the output: [SC] DeleteService SUCCESS
您将看到输出: [ SC ] DeleteService SUCCESS

This deletes the specified service (“test” service in this example) from the computer.
这将从计算机中删除指定的服务(本例中为“测试”服务)。
If the service is running or another process has an open handle to the service, it will be marked for deletion and removed on the next reboot.
如果服务正在运行,或者另一个进程有一个服务的开放句柄,那么它将被标记为删除,并在下次重新启动时删除。
Can’t delete a service?
不能删除服务?
If you receive the following error when deleting the service, it could also be possible that you’re trying to delete a service from a normal Command Prompt instead of an admin Command Prompt.
如果在删除服务时收到以下错误,也可能是您正在尝试从普通的命令提示符而不是管理命令提示符中删除服务。
Should the same error occur in an admin Command Prompt, then it means that the currently logged on user account doesn’t have full control permissions for that service.
如果管理命令提示符中出现同样的错误,则意味着当前登录的用户帐户没有该服务的完全控制权限。
[SC] OpenService FAILED 5:
Access is denied.
To resolve this error when deleting a service, you need to modify the Service permissions first. Alternatively, you can use the SYSTEM or TrustedInstaller account to delete the service.
若要在删除服务时解决此错误,您需要先修改服务权限。或者,您可以使用 SYSTEM 或 trusteddinstaller 帐户删除服务。
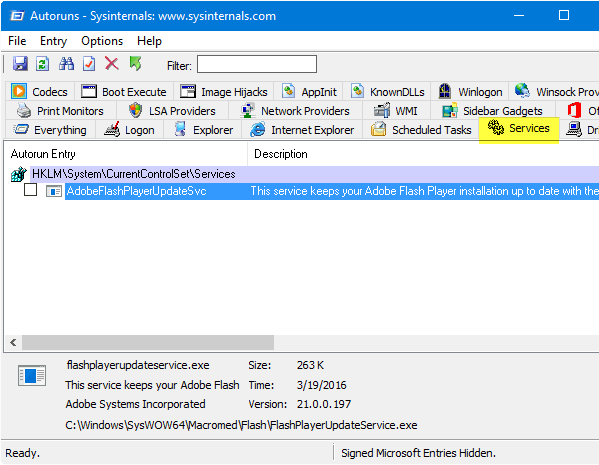
Using Autoruns from Windows Sysinternals 使用 Windows Sysinternals 中的 Autoruns
Autoruns, from Microsoft Windows Sysinternals, is a must-have tool that helps you manage Windows startup, services, drivers, Winsock providers, Internet Explorer add-ons, Shell extensions, etc.
来自 Microsoft Windows Sysinternals 的 Autoruns 是一个必备的工具,可以帮助您管理 Windows 启动、服务、驱动程序、 Winsock 提供程序、 Internet Explorer 扩展程序、 Shell 扩展等。
- Download Autoruns and run it 下载 Autoruns 并运行它
- From the Options tab, tick Hide Microsoft Entries so that only the third-party entries are listed.
- 在“选项”选项卡中,勾选“隐藏 Microsoft 条目”,以便只列出第三方条目。
- Press F5 to refresh the listing.
- 按 f5刷新列表。
- Click the 点击Services 服务 tab to delete the service(s) that are unwanted or leftover. 选项卡删除不需要的或剩余的服务
- Close Autoruns. 关闭自动操作系统
Using the Registry Editor 使用注册表编辑器
To manually delete a service directly via the Windows Registry, use these steps:
要通过 Windows 注册表手动删除服务,请使用以下步骤:
- Start 开始
Regedit.exeand navigate to the following branch: 然后导航到以下分支:HKEY_LOCAL_MACHINE\SYSTEM\CurrentControlSet\Services
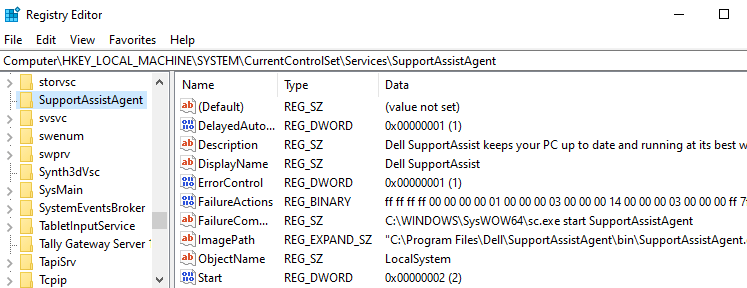
Dell SupportAssist service registry key Dell SupportAssist 服务注册表项 Each sub-key under the above registry key represents a driver or a Service. The key name is the same as the short name of the service. Also, you should be able to identify the entry easily by looking at the DisplayName and ImagePath values in the right pane in the Registry Editor.
上述注册表项下的每个子项表示一个驱动程序或一个服务。密钥名称与服务的短名称相同。此外,通过查看注册表编辑器右侧窗格中的 DisplayName 和 ImagePath 值,您应该能够轻松地识别条目。
- Find the entry you want to delete.
- 查找要删除的条目。
- Backup the appropriate key by exporting it to a .reg file.
- 通过导出到.reg 文件来备份适当的密钥。
- Once exported, right-click the key, and choose Delete.
- 导出后,右键单击该键,然后选择“删除”。
- Exit the Registry Editor. 退出注册表编辑器
Using PowerShell 使用 PowerShell
From the PowerShell administrator window, you can use the following commands to delete a service.
在 PowerShell 管理员窗口中,可以使用以下命令删除服务。
$service = Get-WmiObject -Class Win32_Service -Filter "Name='servicename'"
$service.delete()

ReturnValue of 0 indicates that the operation was successful. The service is deleted and will no longer show up in the Services MMC.
ReturnValue 为0表示操作成功。该服务已被删除,将不再显示在服务 MMC 中。
To know the meaning of a return value, check out the Microsoft article Delete method of the Win32_Service class
要了解返回值的含义,请参阅 Win32 _ service 类的 Microsoft 文章 Delete 方法
sc.exe) when running it in PowerShell. This is because the command ) ,这是因为命令SC (without mentioning the extension (不提分机号码.exe) will be interpreted as )将被解释为Set-Content which is a built-in cmdlet in PowerShell. 它是 PowerShell 中的内置 cmdletIt’s even easier if you have PowerShell 6.0 installed. In PowerShell 6 and higher, you can use this syntax to remove a service:
如果你安装了 PowerShell 6.0就更简单了。在 PowerShell 6或更高版本中,你可以使用以下语法删除服务:
Remove-Service -Name ServiceName
Running the Remove-Service command in older versions of PowerShell (<6.0) shows the error: The term ‘Remove-Service’ is not recognized as the name of a cmdlet, function, script file, or operable program.
在旧版本的 PowerShell (< 6.0)中运行 Remove-Service 命令会显示错误: 术语‘ Remove-Service’不能识别为 cmdlet、函数、脚本文件或可操作程序的名称。
Using Process Hacker 使用流程黑客
Process Hacker is a good process management utility that is similar in appearance to Microsoft’s Process Explorer. With Process Hacker, you can easily delete a service via the right-click menu.
Process Hacker 是一个很好的进程管理工具,它的外观类似于微软的 Process Explorer。使用 Process Hacker,您可以通过右键单击菜单轻松删除服务。
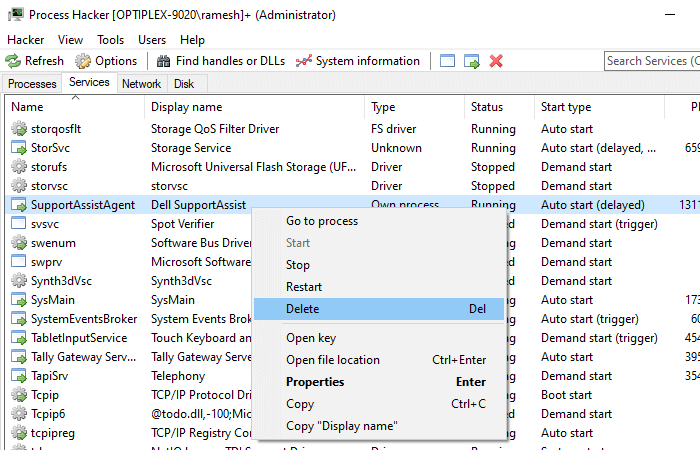
Start Process Hacker as administrator. Switch to the Services tab, right-click on the service you want to remove, and click Delete.
以管理员身份启动 Process Hacker。切换到“服务”选项卡,右键单击要删除的服务,然后单击“删除”。
(As a side note, you can also configure service permissions using Process Hacker.)
(另外,您还可以使用 processhacker. 配置服务权限。)
Download Process Hacker from https://processhacker.sourceforge.io/
从 https://processhacker.sourceforge.io/下载 Process Hacker
View Dependents of a Service 查看服务的受供养人
When you remove a service, others that depend upon the service will fail to start, returning the error “System error 1075 has occurred. The dependency service does not exist or has been marked for deletion.”. When a driver or service entry is leftover in the registry, but the corresponding files are missing, the Event Log would record an entry with ID:7000 at every start.
当您删除一个服务时,依赖于该服务的其他服务将无法启动,返回错误“ System error 1075 has happened”。依赖项服务不存在或已被标记为删除。”.当注册表中的驱动程序或服务条目有剩余,但是缺少相应的文件时,事件日志将在每次启动时记录 ID: 7000的条目。
Log Name: System
Source: Service Control Manager
Date:
Event ID: 7000
Level: Error
Description:
The DgiVecp service failed to start due to the following error:
The system cannot find the file specified.
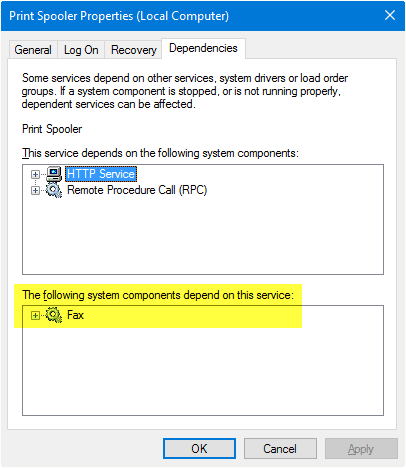
So, it’s advisable first to check if there are any dependents. You can check that in Services MMC by double-clicking on the item you’re going to delete and clicking the Dependencies tab. The list of components that depend on that service is shown below. Here is an example where “Fax” depends on “Print Spooler” to start.
因此,最好先检查是否有任何依赖项。通过双击要删除的项目并单击 Dependencies 选项卡,可以在 servicemmc 中检查这一点。依赖于该服务的组件列表如下所示。下面是一个示例,其中“传真”依赖于“打印后台处理程序”来启动。
While most third-party services don’t have any dependents, some do. It’s always advisable to take a look at this tab before clearing the item.
虽然大多数第三方服务没有任何依赖项,但有些有。在清理项目之前看一下这个标签页总是明智的。
Another way to verify the dependents is to run this command from a Command Prompt window. (example, Print Spooler)
验证依赖项的另一种方法是在命令提示符窗口中运行此命令
sc enumdepend spooler

The information in this article applies to all versions of Windows, including Windows 10.
本文中的信息适用于所有版本的 Windows,包括 Windows 10。