Wishlist 0 ¥0.00

USB dongle in virtual machine – VirtualBox

How to access a local USB dongle in VirtualBox


You may be aware that VirtualBox 5.0 includes USB dongle passthrough support. Here are simple instruction to assist you in using a USB dongle in VirtualBox.

  1. The free VirtualBox Extension Pack can be installed as an option to take advantage of USB 3.0 speeds.
  2. After installation on Windows, Linux, or other supported platforms, start your virtual machine.
  3. Connect the USB dongle to your host computer’s USB port.
  4. Navigate to Devices -> USB, and click on ‘USB device to share’.
USB dongle in VirtualBox

After you connect the USB dongle to VirtualBox, the shared USB device will become available in your host OS. The USB dongle will be recognized by your virtual machine providing complete access to your device. In this manner, VirtualBox allows you to connect to a USB dongle remotely.

Keep in mind that USB devices can only be accessed by one machine at a time.

2. Software solution to forward a USB dongle to virtual machine


Many users run into the issue of virtualization apps that do not offer full support for local USB devices. USB Network Gate is a software solution that can solve their problems.
 
 
USB Network Gate logo

USB Network Gate

Share USB over Ethernet on Windows
4.9 Rank based on 179+ users, Reviews(72)
 
14-day trial, You can share only 1 local USB-device


USB Network Gate


This dedicated tool’s USB redirection technology allows you to forward USB dongle over the Internet or LAN. USB Network Gate allows you to connect to USB dongle from your host machine even if the device is connected to another remote computer.

USB Network Gate

Three simple steps allow this remote connectivity:

  1. Download and install the USB Network Gate application on the machine with the attached USB dongle.
  2. Use the software interface and enable shrug of the device.
  3. On your virtual machine, install USB Network Gate. Start the application and connect it to the shared USB dongle.

USB Network Gate also offers cross-platform compatibility supporting Windows, Linux, and Mac OS.

3. Access USB dongle in VirtualBox via VRDP


Remote display of virtual machines is possible with VirtualBox. A guest OS started on one computer can be displayed and controlled from an alternate PC. VirtualBox accomplishes this through the use of VirtualBox Remote Display Protocol (VRDP). This protocol is backwards compatible with the Microsoft RDP protocol making VRDP an excellent solution when you need to access a virtual machine over an RDP connection.

VDRP also allows easy access to remote USB devices in VirtualBox. When displayed on a remote machines as VDRP data, the guest OS in VirtualBox can access all USB devices on the remote machine as if they were locally attached to the VM’s real host.

The ways to connect USB device in Virtual Machine

1. What is virtualization


Virtualization, i.e. technology that allows creating a virtual version of a device or a resource, such as server, storage device, network or even an operating system, has been around for years. It offers you so many benefits that it is hard to imagine now that once upon the time we lived in ‘physical only’ world. But beware – virtualization has certain shortcomings too. One of them is having no access to USB ports, i.e. in Microsoft Hyper-V, VMware USB passthrough is not possible. This means you cannot use contents of a USB dongle attached to a host computer on virtual servers, and arises a questions how to connect USB to VMware virtual machine?

There are two main ways of going about this issue:

  • Using third party software solutions that pass data of USB in VMware and other virtual environments
  • Utilizing integrated methods of adding USB devices into virtual machines

2. Software to access USB in virtual machine

 
There is special software that enables USB passthrough device to a virtual machine. It allows you to configure the number of virtual USB ports and connect devices of different types and different storage capacity (for USB drives). It also allows passing data of several USB ports through virtual machines.
 
 
USB Network Gate logo

USB Network Gate

Share USB over Ethernet on Windows
4.9 Rank based on 179+ users, Reviews(72)
 
14-day trial, You can share only 1 local USB-device


USB Network Gate


With the help of USB over Ethernet you get access to USB ports that are physically connected to the main (host) operating system of the computer where virtual OS is installed or any other remote computer no matter where it is actually located. USB Network Gate also enables you to pass data of remote USB device in virtual machine.

USB Network Gate

To create a virtual connection with the help of USB Network Gate do as follows:

  1. Install the application on the host and virtual machines;
  2. Share a USB device over network;
  3. Setup connection to USB device for a virtual machine.
USB Network Gate

The device is displayed in Device manager of your virtual machine and your OS sees it as it were directly inserted into your machine. One of the biggest advantages USB Network Gate offers is multiple OS support – Windows, Linux, Mac.

3. About VMware: Workstation and ESXi


VMware is an information technology company founded in 1998 to deliver various platform virtualization software and services. Now it takes one of the leading positions in the market of virtualization apps. VMware generally provides solutions of two types: desktop software and server applications.

VMware

The first category covers VMware Workstation - a hosted hypervisor working on Windows and Linux x64 platforms. With the help of VMware Workstation users can set up virtual machines (VMs) on their actual computer and run them concurrently with the physical device. That means a physical machine can execute multiple operating systems at a time, each on its own VM.

For those looking for a non-commercial use of the solution, the company offers a free VMware Workstation Player. And for Mac users, there’s a VMware Workstation analogue called VMware Fusion. This software makes it possible for Macs based on Intel processors to execute different OSes atop of macOS.

The second most popular VMware product is VMware ESXi, a type-1 (bare-metal) hypervisor which does not work as a typical software installed on an OS. ESXi comes with all crucial components of OS already included and runs right on the server hardware. As a result, a user doesn’t need to install any additional operating system.

4. Software solution for VMware USB redirection


The big advantage of the solution is that it’s capable of forwarding nearly any USB device across the Internet, local network or Ethernet. That means you don’t even need to have a USB device physically present near your host computer to enable VMware workstation USB passthrough. A simple installation of the program on both host and guest platforms will be enough to add USB to VMware virtual machine.

With its unique ability to redirect USB over IP to VMware, USB Network Gate opens new boundless opportunities for users working with POS equipment, automated industrial lines, mission-critical enterprise apps, etc.

Based on an advanced port virtualization technology, the utility can also easily share those particular USB devices that have never been supported by VMware solutions. For instance, if you try to access a mouse or a keyboard with a bootable HID interface from VMware ESXi, you’ll face a real problem, as these peripherals, as well as real-time video cameras and audio devices that use isochronous data transfers, cannot be redirected to VMware ESXi server by native methods. Thankfully, USB Network Gate can resolve this challenge once and for all.


USB Network Gate by Eltima Software

To redirect USB to VMware virtual machine, you can use a dedicated utility, USB Network Gate, which works as a wireless connector between your guest OS running on VMware ESXi or VMware Workstation and a USB peripheral attached to your local PC or any remote computer.
 
 
USB Network Gate logo

USB Network Gate

Share USB over Ethernet on Windows
4.9 Rank based on 179+ users, Reviews(72)
 
14-day trial, You can share only 1 local USB-device


USB Network Gate


Here’s all you need to do to enable VMware ESXi USB passthrough:

  1. Download USB Network Gate and install it on the computer where the required USB device is connected physically.
  2. Start the software and share the peripheral in the app’s interface.
  3. Install the program on a VM, launch it and connect to the shared device in the “Remote USB devices” tab.

USB Network Gate is cross-platform, so you can establish network communications between Windows, Linux and Mac machines in different combinations.

5. The native method to connect USB to VMware


  • Following is the description of how to connect USB to VMware virtual machine running on VMware Workstation:

    When you attach a USB device to a host PC, the device by default connects to the VM instead of the host computer. If it doesn’t, you’ll need to manually redirect the device to the virtual machine. If the device is connected to the guest OS, Workstation retains the connection to the host system’s USB port. In case you suspend the VM, power it off or unplug the device and then plug it again or resume the guest operating system, Workstation reconnects the device. If the device is not reconnected by Workstation but is still available, you can redirect it manually.
    To do this: Choose VM > Removable Devices > Device Name > Connect (Disconnect from host).

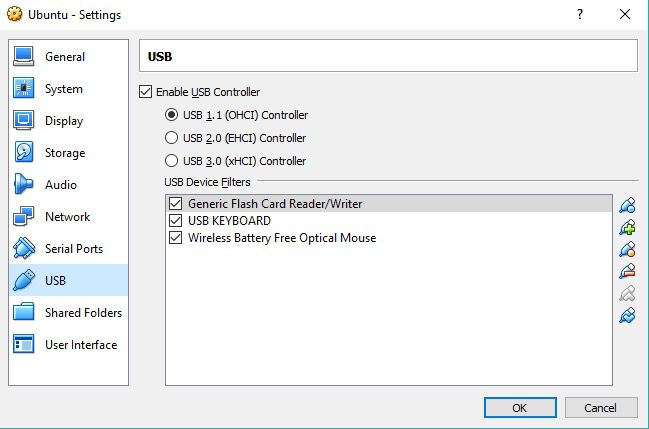
  • To redirect USB devices to VMware ESXi you should follow these steps:
    1. Log into your VMware vSphere Web Client and access your Inventory.
    2. Open the list of Virtual Machines and choose the one to which needs to access the USB device. Right-click and select the “Edit” settings.
    3. Then, go to the “New device” menu, choose “Host USB device” and hit “Add”.
    4. In the drop-down menu, select the USB device that will be added to the virtual machine.

6. Connect USB device to a virtual machine


If you plug in a device into the host computer when a virtual machine is running and its window is active, the device automatically gets connected to the guest system instead of the host. You can disable the autoconnect feature in the USB Controller panel accessible via Virtual Machine Settings Editor.

If a USB device is attached when all the USB ports of the virtual machine are already occupied, a dialog box will be displayed. It will give you options either to disconnect one of the already connected devices so you can free up a port for a newly inserted device or ignore a new device. If you choose the latter, the device will be connected to the host.

If you would like to specify what USB devices are to be connected to a virtual machine, go to VM > Removable Devices. The max number of USB devices you can connect at a time is two. If a hub is used for connecting devices to the host, you will not see the hub, only the virtual devices.

Each of the USB ports has a menu item, hover over them to display a cascading menu of devices plugged into your host computer and available for use on your virtual machine. Clicking the name of a device will connect it to the virtual machine. If a device is already connected to that port, click the name of a newly attached device to release the first device and connect the new one.

USB Network Gate

To release a device, find a port to which it is connected and choose None in its cascading menu.

If a device is connected to the host machine, e.g. you plugged it into the computer while the autoconnect feature was disabled, you can connect it to the virtual machine manually via VM > Removable Devices menu.

7. How to mount USB drive to Hyper-V


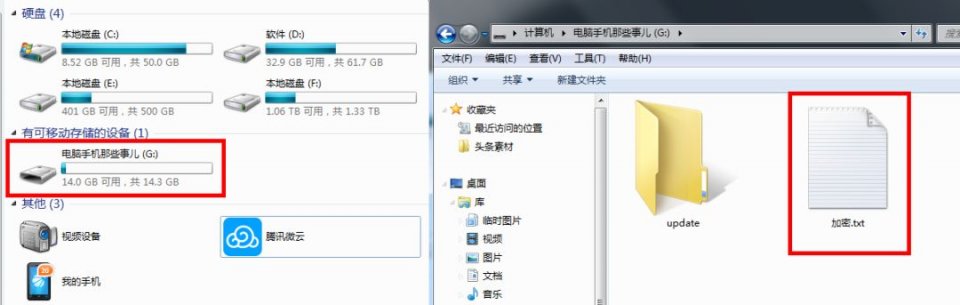
To connect a USB drive to a virtual machine install it as virtual hard disk in Hyper-V virtual environment. You can do it if you know the size of the drive, to find it out on your host machine click Computer, find your removable disk, right-click to display the context menu and go to Properties. General tab will have information on the size of your hard drive in Bytes and GB.

How to install a USB drive as a virtual hard drive:

    1. Right-click on your Hyper-V server, choose New > Hard Disk, or do the same from Actions menu; follow the instructions.
    2. When prompted enter a name for your drive, click Next.
    3. Choose ‘Copy the content of the specified physical disk’ and enter the details to identify the disk.
      Copying the content of the removable storage and creating the USB.vhd file might take a while, it depends on its size. The amount of free space does not matter, a vhd file is created with the entire size of the removable storage.
    4. Choose Settings on your virtual machine, select SCSI Controller – see the left pane; select Hard drive – see the right pane, click Add.
USB Network Gate
  1. Click Browse and choose to open the vhd file to which you mounted your removable storage. Your removable storage should be displayed as a drive.

If ‘My Computer’ does not show it as a removable storage, it might be because the drive is offline. To check it, go to your VM, right-click Computer, choose ‘Manage’ or ‘Administrative Tools’ and go to Computer Management.

Expand Storage and select Disk Management. Red arrow icon means that the disk is offline, right-click the disk and in the context menu displayed select Online. Once your disk gets Online status, a drive letter will be assigned to it.

There are certain drawbacks to this method: you will have to reproduce the entire actions sequence for each USB drive connected to your Hyper-V virtual environment. As we already mentioned, creating a vhd file might consume some time, it directly depends on the size of your USB disk.

Can I use two network adapters to double my Internet speed?

Question from Bill K.:  I just bought a new desktop computer that has both a wired Ethernet port and a wireless Wi-Fi card in it. That got me to thinking.

Is there any way to use both of those network adapters at once to double the effective Internet speed coming from my router?

Rick’s answer:  Bill, there are indeed ways to use multiple network connections to connect your computer to multiple networks and do other useful things, but using two network adapters to connect your computer to your router at the same time cannot and will not double your effective Internet speed.

The speed at which your PC will be able to send and receive data over the Internet is limited by the maximum speeds supported by the modem and router as well as the maximums speeds available with the service plan that you are subscribed to via your Internet Service Provider (ISP).

Simply adding additional connections between your PC and your router can’t change the maximum speeds that your Internet connection, modem and router can provide.

Your modem, router and Internet connection together make up the “pipe” that carries data between your computer and the Internet at large.

The “size” of that “pipe” (i.e. your maximum Internet download and upload speeds) is determined by the slowest component operating within it, and adding new connections between your computer and router can’t make the “pipe” any larger.

While it’s possible to add an additional “pipe” by subscribing to a second Internet connection and then connecting to each Internet connection with a different adapter, doing so would be both costly and impractical for most home users.

Bottom line: I wish I had better news, but I’m afraid you’re pretty well stuck with the maximum data transfer speeds that are supported by your modem, router and Internet connection because you can’t increase those maximum speeds simply by connecting additional network adapters between your computer and router.

I hope this helps Bill. Good luck!

简单几步将U盘打造成电脑登录“密码锁”,不插入就别打开!

Hi,大家好,我是小雨。虽然现在的手机非常流行,几乎可以使用手机来完成大多数的日常事务。不过,也并不是说电脑就没有用了。毕竟一些专业性的事情还是需要使用电脑来解决的。

在使用电脑的时候,尤其是办公室的电脑,如果不想让别人随意打开的话,最好是设置一个密码。不过,今天小雨给大家介绍一个更实用的方法:硬件加密——将U盘打造成电脑登录“密码锁”,不插入就别打开!

一、所需工具

★U盘一个,大小 随意;

★Windows电脑一台;

二、加密锁制作原理

Windows在每次启动的时候都会随系统自动加载一些底层服务和部分应用软件。在系统开机启动项里面添加一段检测U盘中指定文件的代码,以达到判断使用者是否为非法用户的目的。如果指定文件存在,则使用者可以继续使用电脑;如果指定文件不存在,则系统会强制关机。

三、制作方法

1、将需要制作“加密锁”的U盘插入电脑中,然后在这个U盘中新建一个文本文件并修改名称。在这里小雨为演示方便,将文本文件的名称修改为【加密.txt】。

PS:此处新建文件时可以是任意形式的文件,实际上它只是一个标识。只要和后面的启动控制文件里面相对应即可。

2、打开记事本(快捷键【Win+R】并输入notepad可快速打开)并输入以下的内容。

if not exist G:\加密.txt shutdown -s -t 30 -c "非法用户,电脑将会自动关机!"

添加好的内容如下图显示:

上代码中的部分含义解释:

【G:\加密.txt】表示U盘的盘符为G盘,里面存在一个名称为“加密.txt”的文件;

【30】可修改,表示当G盘中不存在“加密.txt”时,系统会在30秒后强制关机;

【文字内容】可修改,表示关机前的用户提示语;

之后将这个文件保存在C盘,名称为“开机.bat"。

3、按WIN+R键打开运行窗口,输入gpedit.msc 回车打开组策略编辑器;

4、在组策略编辑器中,依次进入【Windows设置】-【脚本(启动/关机)】,双击打开【启动】,点击【添加】,选择刚刚保存在C盘下的【开机.bat】,然后点“确定”即可。

四、测试效果

在完成了以上的设置后,小雨关闭电脑并重新启动。

第一次插入U盘时启动,Windows正常开机,没有任何提示。

第二次在没有插入刚才制作好的那个U盘时启动,系统出现了错误提示,并强制自动关机。达到了初始的效果。

今天分享的这个技巧,你学会了吗?关注小雨,学习更多电脑知识!

你觉得使用这个方法加密电脑,实用吗?你还有哪些好的方法欢迎大家留言交流!

About Us

Since 1996, our company has been focusing on domain name registration, web hosting, server hosting, website construction, e-commerce and other Internet services, and constantly practicing the concept of "providing enterprise-level solutions and providing personalized service support". As a Dell Authorized Solution Provider, we also provide hardware product solutions associated with the company's services.
 

Contact Us

Address: No. 2, Jingwu Road, Zhengzhou City, Henan Province

Phone: 0086-371-63520088 

QQ:76257322

Website: 800188.com

E-mail: This email address is being protected from spambots. You need JavaScript enabled to view it.